Friday, March 29, 2013

From Sketch to Journal Page - She Listens

3 comments
Last week, when time at my art table was slim, I started feeling the nudge. That quiet (and sometimes booming) voice calling me to get creative. I didn't want to give up my family time, so I snuggled up with my Hubs & kiddies on the couch (movie night) and did a quick sketch in my journal. 

She started out with just basic lines. Quick and loose because I wanted to watch the movie! :)


After more time the following day, she looked like this...


Now she has some color, more detail, and the words... "Listen to the whispers of the heart." I have just a few more little details to add and then some more writing.


Just a little reminder to myself (and you!) to always listen to the truth that lies deep inside your heart. Don't be discouraged by circumstances, negativity, insecurities, or the words of others. Be encouraged - you are beautiful...just as you are. Happy Friday Friends...Happy Good Friday. :)

Monday, March 25, 2013

What to do With All Those Scraps

4 comments

You know that I love paper. So, being enamored with all kinds of paper...I find it hard to throw any scraps away. I am always thinking, "Wait, I know I can use that for something." What do you do with your scraps of paper? Of course being a mixed media artist allows me to create all kinds of interesting backgrounds from a mixture of papers. Some fab paper, some Mod Podge, and canvas (or journal, or cardboard, or scrap wood)...what more do you need? :)


So, right next to my studio table I have a basket that I keep as a collection bin for the various bits of paper. Whether I am working on pieces for the shop, getting crafty making some DIY project for the house, or creating pages for Project Life - there is always oodles of extra paper. I toss them into the basket in hopes that they will make their way onto another project. I also keep a larger plastic bin (the inexpensive ones - shoe box size - from the organizational section of Target) that I keep small pieces of paper in as well.


Every once in awhile, when the bin is getting close to max capacity, I decide it's time to do something with them. I take all the little pieces of paper and glue them down in my journal or another surface. I don't pay much attention to where I put them because I know much of it will be covered up in layers. All the little papers together make for an interesting background.


Now I have some backgrounds ready to be layered up with paint, stamps, stencils, pen and more. I have cleared out my little basket and have pieces ready to start. Love it! Little pieces of paper would also be perfect for making cards, bookmarks, journaling cards, or a creative stash for your kids to art with. The 5x5 wood panel directly above, got some artsy attention and made it's way into my store. Here it is all finished.


You could also use the left over paper pieces to collage darling pieces like the one below. Look at these fun, colorful flowers. Little bits of paper goodness are perfect for pieces like this!! Wait until you see some of the new patterned paper I got too. It is just divine!! See, I needed to get rid of my scraps to make room for more. Ha! I have a serious paper problem. :)


Happy Creating!!

Friday, March 22, 2013

From Cardstock to Journaling Cards - Project Life, Smashing or Anything!

3 comments

Recently, on one of my many trips to Michaels (Seriously. I know. It's like I go every week. I don't. Usually.) I spotted a "last chance" bin of some scrapbook papers. At 14 cents a sheet, I couldn't help but rummage through it. I grabbed some great patterned paper, but also spotted some plain white card stock. Ahhhh! So perfect for making some of my own Project Life journaling cards. SO fun! The cards could also be easily used for other journaling, stuck down in a Smash Book, used for cards, or attached to gifts as a tag. If you are not familiar with Project Life, check it out right here on Becky Higgins site. I am joining the PL tribe this year, and look forward to writing more about it here on my blog!

So I took this plain white paper...


Used my good ol' Fiskars paper cutter (I think I have had this longer than I have been a mom - so like, 8 years! Love it!) and cut down the 12 x 12 pages. The Project Life system (which is SO easy for the non-scrapbooker, total newbie - ME!) uses sheet protectors with little pockets that are about 3x4 inches. I cut the cards a little smaller than 3x4 so they slide easily into the pockets. I used a card from one of Becky's kits as a guide.


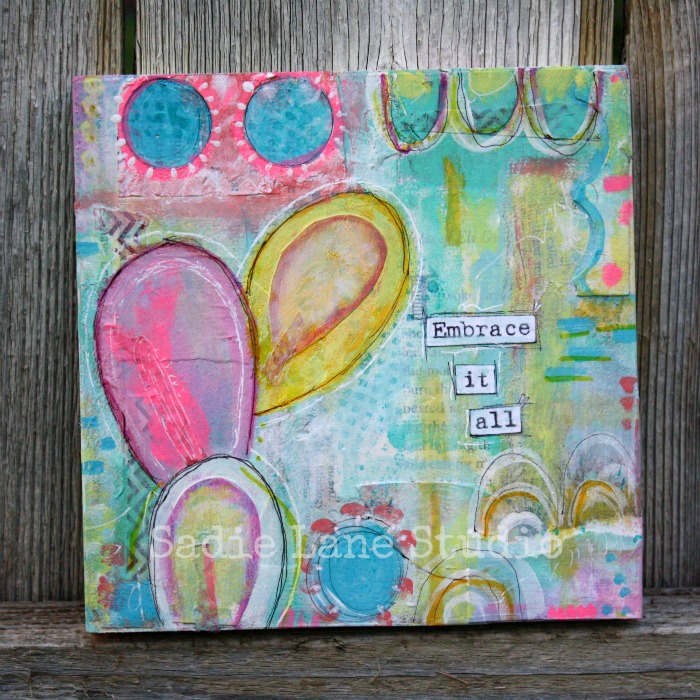
After I cut a bunch of 3x4s, the mixed media artist in me needed some larger pieces for a few messy spring canvases. :) So I also cut a 5x5 and a 5x7. I thought it would be fun to paint a few spring themed pieces to frame, then add to my house. I know I am ready for some spring around here! How about you???

I keep a little journal to jot down ideas for Project Life cards. There are SO many wonderful card designers out there. I love looking around Instagram and Pinterest. I can not believe the creativity out there. Seriously! Amazing!! Here are a few of my sketches..


So referring to my sketches, going with the flow, using my creative mojo, and grabbing some of my favorite washi tapes...I started to make my cards. I can see how this could be very addicting! I do LOVE all the different things that the various paper companies have out on the market right now for journaling and Project Life. But, it is super exciting to make some things on my own. I know I will continue to do both - buy some pre-made cutie stuff and make my own.


Look at this beautiful tape. Be still my heart. Washi = Love. 
Lol. Please, tell me I am not alone in the love of washi? :) The mustard yellow chevron washi and aqua stripe came from Michaels (no big surprise there). The yellow stripe was a gift from my uber creative friend Toni from Five. The yellow polka dot washi came from a package of four tapes that I scored from Target on clearance! I sure do love a crafty deal!! Washi tape is perfect for smashing and Project Life too. 


See, just a little hint of aqua and white polka tape peeking out from that "right now" sticker looks great. I stamped the zig zag with a $1 stamp. Then added that adorable Heidi Swapp striped butterfly. (She is another favorite of mine!) Now all I have to do is journal a bit in the white place or add a little picture. Then slide it into my PL binder. Easy Peasy. :)

I need to go get busy on making more cards!! It was so relaxing to just sit and create these little beauties. I have tons of ideas swirling around in my head. Of course I am going to spend time painting too.  I have the 5x5 started...and will hopefully find some time at my studio table this weekend.


WIP 5x5 Mixed Media
Background - washi tape, book pages, Basic Grey paper


I'll come back and show you my little spring 5x5 and more Project Life journaling cards as I make them. I am looking forward to sharing all this creative goodness right here on Sadie Inspired. Yiippee! :)

How do you share all the pictures you take?
I'd LOVE to know!!

Wednesday, March 13, 2013

Why Not!? Wednesday - Using Modeling Paste

3 comments
 If you have read my blog before you know I LOVE using modeling paste. I love the way it looks. Don't you? The instant texture not only looks fabulous, but adds tons of visual interest. It is so easy to use too. Plus there are so many things to do with it. Soooo, why not use modeling paste with shapes. What I mean by that is...instead of applying it randomly (which is also fabulous I might add) across your surface...be very specific about where you place it.

For example, use modeling paste within angel wings. I think the dimension it adds to this piece is lovely. On this piece, not only is the modeling paste emphasizing her wings, but also a pretty shimmer paint too. I just dragged my palette knife (or popsicle stick) across the space of the wing in the same direction. If I went out of the lines of the wing, I simply wiped it away with a damp cloth or baby wipe. Easy!


 More angels with textured wings...


 What about flowers? Spring is almost here, and beautiful blooms are everywhere. Why not use modeling paste?? Below is a canvas I painted for my master bedroom in light blues, creams and grays. On the large flower petals, to add that visual interest again, I "painted" with the modeling paste. I used the same technique as the wings. After the paste is completely dry, I used watercolor and acrylic paint on top. I love how the raised parts of the petals collected the color. Oh, and remember that you can add paint color directly into the modeling paste before you use it too!


There are many different shapes try - hair, animals, grass, ocean, mermaid's tail, clouds. Those are just a few that come to my mind. What can you think of? Why not go give it try!! :)


Happy Creating!

Friday, March 8, 2013

New Orignal Art and Happy Friday

5 comments
Happy Friday! I am always happy to greet Friday morning, aren't you? It may be cold, dreary, and rainy outside - BUT, it is Friday - so it is alllllll good. :) Rain is perfect for a cozy, relaxing day inside anyways. That is exactly what me and my little guy are doing today. Yesterday we celebrated my daughter's 8th (what!?) birthday, but came home from our dinner out to my son getting sick. Boo! So my daughter ended her celebration in tears because she was worried about her brother (super sweet). He is feeling MUCH better now thank goodness, but the slow morning has finally allowed me to get some computer work done - MY word! 

Before I get to the new paintings, I wanted to show you my daughter's decorated birthday seat. This is one of our family traditions. Each year for the kid's birthdays I decorate their seat for their birthday morning. The excitement they get from running downstairs to see their special space warms my heart and make is SO worth it! This year I decided on hearts (let's be honest - because it was easy!) and had fun laying out a bunch of pictures (old and new) too. I had to hold back Mama tears seeing my baby girl...as a baby! I know we say it all the time but, it all goes WAY too fast. Sigh...


On with the art... I finally listed this angel I painted with textured wings. I just LOVE using modeling paste on angel wings. It has sparkle too!! Gotta love the sparkle. :)


I wrote about this beautiful color combo back here and now she is in the shop. I am slightly obsessed about this color combo. Throw in some aqua and I am weak in the knees. ;) I am loving her trendy feather too.


AND, a bright - oh so happy - abstract 6x6 that I created on cradled wood. Ready to hang cradled wood = my absolute FAVORITE - hands down. Big, gushy love.


It's funny. I love painting whimsical girls, sweet girls for room decor, inspirational girls with positive messages... but, I would be more likely to hang abstract art in my own home. Well...or flowers maybe. But, not really girls. Funny how that works. Look at this fun circular wood panel (about 7 inches across) that is heading into the shop. Isn't the shape fun!? This wood panel is too thin to attach a sawtooth hanger, so I am selling it as is. BUT, it looks wonderful in a stand. So it is perfect for a shelf or top of a dresser. I am definitely going to try and find more of these wood circles!


That's it for now. But I feel a creative burst coming on so I am hoping my creative mojo explodes. :) I hope you are having a wonderful week full of joy, smiles, and artsy goodness. Are you planning any projects this weekend? We are planning a Dr. Seuss themed birthday party for the following weekend, so I will probably be somewhere between Whoville and the land of Truffula Trees. :)

Come share your creative happiness with us at Studio JRU's Sneak Peek Friday!

Saturday, March 2, 2013

Neon Journal Page & My Jennibellie Journal

8 comments
Happy Weekend! I hope you are enjoying a wonderful day. It is absolutely beautiful here, and I am itching to get outside when I get all my computer work done. Yikes! Look at this stack of paintings with photos to edit and listings to make. That's just one pile. :) I love the creating...but, it takes awhile for all the other stuff. I DO LOVE all the different elements in the beginnings of a new creative business. I get so excited about the possibilities, the goals, and all the many ideas that come into my head. SO, I happily work through the long list of "to dos." ;)


How was your week? It was a busy one at our house. Doctors appointments, my son's birthday, character dress up day at school, preparing for my daughter's birthday next week, painting, journaling, and starting Project Life (OH, yes it has begun!). So many things happening, but I did get a chance to play a bit in my art journal. I found some Americana paint in bright neon that I was dying to try. The colors I used were Torrid Orange and Sizzling Pink. SUPER fun!


I am still working on this page. I am feeling some words, more neon, and Inktense watercolor pencils are in order. I can tell you that I will be going back to find some more neon colors. I think they will be perfect to play with this spring. AND I do have to admit that these colors did bring me back a bit to the 80s neon. (If you are my age, you will know EXACTLY what I mean.) I honestly had a pair of ginormous earrings and matching belt in Torrid Orange. Anyone else? :)

Instagram @sadieinspired

Besides my little LoveBug turning 4 this last week, the highlight was getting my Jennibellie journal in the mail all the way from England. I was fortunate enough to win a giveaway on her blog a couple of weeks ago. I adore her, her amazing creativity, and artistic generosity - so it was a pleasure to receive something from her.  I couldn't wait to open it up! It is so full of little goodies. I am so looking forward to adding all kinds of things into it.


It is made with all kinds of pretty patterned paper, vintage book pages, and original painted paper. Not to mention all the little embellishments inside as well. If you haven't checked out her blog or YouTube channel - you must! She makes all kinds of amazing things from stuff you have lying around or in your artsy stash...maybe even your trash bin! Thank you oodles and bunches lovely Jennibellie!! I will treasure it. :)

Yummy painted pages!

I hope you have a fabulous rest of the weekend and upcoming week. I am looking so forward to celebrating my daughter's 8th birthday this week. It makes me all kinds of emotional. I do not know where the time has gone. She is growing faster that I can handle. Lol. BUT, I will set my mama tears aside and celebrate the lovely, sparkling girl she is becoming!

Detail of abstract canvas headed into the shop!


Happy Creating!

Come visit Paint Party Friday & Studio JRU