Showing posts with label fall. Show all posts

Monday, November 10, 2014

November Gratitude Journal - 30 Blessings

0 comments


Wow! I can't believe it is the second week of November. Seriously, I am not even sure there was an October. At least that is how I feel. In all honesty, it wasn't the best month for me. So, in order to "bring the mojo back" and focus on all the wonderful blessings in my life...I decided that November would be a fantastic time to make a Gratitude Journal or Mini Album. I have seen so many beautiful mini albums this fall (and in the past) that inspiration struck and I couldn't wait to get busy. 

Just recently, I received my me & my BIG ideas Design Team box too. Of course it was jam packed with so many inspiring products...perfect for this kind of project. I mean, LOOK at those gold glittery alphas above. Be still my beating (glitter loving) heart!

With gratitude on my mind and mambi goodies waiting to be used, I headed over to Hobby Lobby to find an album. I wasn't exactly sure what I wanted, but I knew I wanted to have some small pocket pages in the album. Well, let me tell you, as soon as I saw this Paper Studio 6x8 chipboard album I may have let out a joyous squeal. (Yes, art & scrapbooking supplies bring audible bursts of happiness. Ha!) The album only costs $6.99 (HELLO) and it was on sale at 40% or 50% off. Amazing deal, especially since it had 10 pocket style scrappy pages inside. Divine!


The best part about a chipboard album is that it can easily be altered. There is an endless list of fun things that can be done to jazz up the cover. Personally, I love kraft just the way it is. But, for this project I wanted to get messy and alter the cover. I used some white gesso and modeling paste on the outside of the album and decided to keep the inside plain.


After I was happy with the texture, I played around with stacking some beautiful mambiSHEETS paper with a white doily and some mambi Die Cuts. The stack was glued together and I used some alphaCHIPS and mambiSTICKS for the title. I added bits of gesso on the edges of the paper and added some thin twine (bakers) along the side. I really love how my Gratitude Journal turned out. I am going to have tons of creative fun reflecting on my many blessings this month. :)

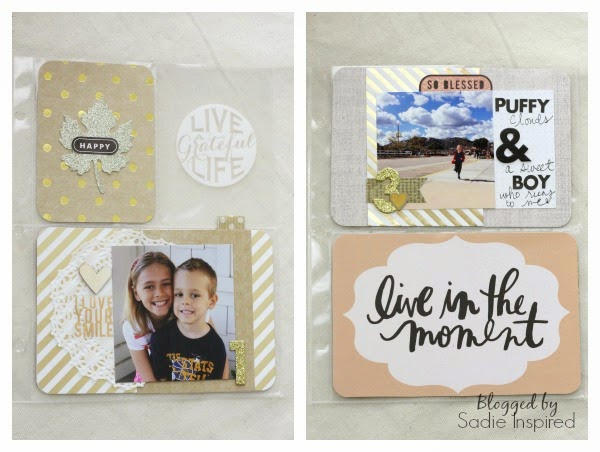
Journaling for the first page shown is behind the bottom card. I attached a little tab to the journal card and tucked it behind the other. The tab can be spotted on the right side. Sometimes, I like to keep the journaling hidden or make pocket scrapping more interactive. 

Here are a few of the inside pages. Since I plan on documenting my gratitude daily or every couple of days, I didn't want the inside pages to become too "involved." I wanted the process to be simplified, so I could focus on the thankfulness and not become overwhelmed. I think it did help that I spent some time (while watching the 2nd season of Downton Abbey) prepping the inner pages. I just added some pretty papers, journal cards, and a few embellishments beforehand. This makes the actually recording run much smoother.


Thank you SO much for stopping by! I'll be back later with more updates on my Gratitude Journal....plus updates from my shop (Holy smokes it's been awhile), prepping for my December Daily, Art Journal love, mambi Design Team projects, and plenty of fun for a creative Christmas!

Happy Creating,

Thursday, October 30, 2014

Fall Home Decor - Wood Blocks with mambi

1 comments
I LOVE decorating for fall. Don't you? I really don't decorate much for Halloween...just outside with some spiders, webs, crows, and maybe a few bats. Inside the house, I love to warm the rooms up with autumn colors, leaves, pumpkins, and anything I can find or alter to bring the season to life.

Today I have a super easy and fun fall project to share with you. The best part... I started with some old wood blocks I had in my "leftover bin" in the garage. (I have an old crate sitting in the garage to collect scrap wood from various projects my Hubby or I have worked on.) 


Here is a list of materials I used:

Old wood blocks
white paint 
white doilies
twine
small wood finials
mambi SHEETS - Mixed Media, Gold Rush & Straight to the Heart
mambi Fall Leaves Die Cuts
mambiSTICKS Large Alphas - Gold

I really love how they turned out! 
If you want to see the steps I took to make this fun fall home project, please come visit the me & my BIG ideas right HERE!


Happy Creating!


Friday, November 22, 2013

Adorable Fall Owl Craft

0 comments


How cute is this little guy? It's perfect for a quick fall project, right? Thanksgiving break is coming next week in the states and this owl craft would be perfect to do with your kids, family, or grand kids. 

My daughter came home from school last week and wanted to teach her brother and I an art project they had done at school. She was super excited to show us! 
I have to give all the credit to her and her fabulous teachers. :) 
It is super easy and loads of fun.
Here's what she had us do....

Gather supplies:
pine cones
cotton balls
glue
googly eyes
yellow round stickers
feathers
construction paper 


First, break the cotton balls apart into smaller pieces and begin stuffing them into the spaces in the cones. We didn't use glue for this. The cotton stays tucked nicely inside. I am sure you could use glue, but it is not necessary. 

After the owl is fluffed up, decide which side in going to be the front. Now, use the glue to attach two whole cotton balls to the top portion of the cone for the base of the eyes. Place a round yellow sticker in the center of each cotton ball. Then, on top of that glue a googly eye. Repeat for the other eye. 


 Using some yellow paper cut out a small folded beak and glue between the eyes. The final step is to glue a feather on each side for the wings. We just put a little bit of glue on the end of the feather and stuck it into the pine cone. There are lots of different variations that can be done for the wings! My kids wanted their owl to have brightly colored wings. :)

That's it! Your adorable owl is finished and ready for display.
SO cute!


Happy Creating,


Monday, November 18, 2013

Gratitude Jar - mambi Design Team Project

1 comments
Hi all!
I hope you had a wonderful weekend. :)
 
I had a creative weekend...painting, scrapping, and crafting away. Thanksgiving will be here in no time and I have a super fun, easy DIY project up on the me & my BIG ideas blog today.


It would be a perfect addition to your Thanksgiving day and décor. Come read all about it

Tuesday, October 22, 2013

Cute, Quick & Easy Halloween Treat Bags

0 comments

 Halloween is just about a week away, and I don't know about you... but, I always have friends or neighbors that I love to spoil a bit. I wanted to make something quick & easy, but super cute. I thought the me & my BIG ideas Halloween themed POCKET PAGES cards would be perfect to make that happen. Look how cute they turned out! There are several different 3x4 cards in each set, so each bag can be a little unique. PLUS, an extra bonus - the 4x6 cards can be used for decoration around my house and the left over 3x4s will make their way into my Project Life album. Perfect!!

This is all you need to make these adorable goodie bags...


Supply List: 
  • me & my BIG ideas Halloween cards from Michaels (there are 2 different packages. I couldn't decide which one I wanted. So, I just had to get both!)
  • $1 ribbon also from Michaels
  • Small kraft colored bags (Hobby Lobby)
  • Small white doilies (Hobby Lobby)
  • Goodies for your little monsters :)
  • Adhesive & Hole Punch
  • That's it!
Once I had my supplies, I sat down at my table and got to work. First, I adhered the doily to the kraft bag. I layered the cards on top. The mambi sets include cards with sayings and cards with cute patterned paper. That makes projects like these a breeze! I used the patterned paper (with sparkle!) to make little banners along the bottom of some. I punched holes in the top, filled the bag, and tied my ribbon. I just love that I can fill the bag with other goodies besides just candy too. Right!? The little munchkins will get plenty of sugar already!! :)

I hope you are having a wonderful week.
Happy Creating,


Saturday, November 24, 2012

New Jewelry and a Sale

5 comments
Hi friends!

I hope you had a beautiful Thanksgiving (in the states). Our celebration was wonderful! My hubby and daughter have had the whole week off which is the best for me. :) On Wednesday night, we were able to spend the evening with my in-laws and nephew at Disneyland. It is always magical there...but, especially during Christmas. We watched the castle lighting (special decorations for the holiday season) and danced around Main Street as it "snowed." Such a perfect night before Thanksgiving.


We hosted Thanksgiving dinner this year and I am one lucky girl. My husband does all the cooking!! How fab is that!? He is a fantastic chef too, so we all have full bellies by the night's end. :)

Yorkshire Pudding comes once a year.
 Also, I have been working on my shop for Cyber Monday. I have a few new items that I have been putting my heart and soul into. I currently have everything in my store 25% off through Sunday. Just enter coupon code BLACKFRIDAY25. One of a kind pendant necklaces are making their way into the shop. They really are unique little pieces of wearable art. No one necklace is the same. :) LOVE that! 


Ornaments too! 


 Don't forget that my Whimsy Christmas Workshop is also coming next Saturday, December 1st!! I still have some seats available. Soooo, if you are in southern California come join us. It will be a fun afternoon of festive art making. More information on my Workshop page. Just hit the tab above!  


Have beautiful rest of the weekend. 
We are knee deep in Christmas decorations over here! 
How about you?

Tuesday, November 20, 2012

Insta-Thankful

2 comments
There is so much to be thankful for this week. Family, friends, love, shelter, warm blankets, laughter, art, beautiful mornings, smiles, healthy children, freedoms...I could go on for days. After the devastation of Hurricane Sandy and the pain around the globe, I don't want to take anything for granted. 

I am so thankful that I have been able to grab little snippets of life throughout this last year on my iPhone with Instagram. Once the year is over, I hope to make some digital photo books. That way my family can easily look back over all the sweet moments and blessings we have had this year. Can't wait to put them all together. I may need a few volumes though. :) 
Here are some favorites lately...

 Getting ready to use some new watercolor pencils that I found on clearance. Sweet!


Yes! The boots have come out. Fall, I love you!

 Strolling along the aisles of Michaels with my FREE Starbucks coffee. They gave it to me for free because I had a long wait. Noooo problem!

 Our adorable entourage after feeding them some good bread.

 Election Night 2012 - My little man doing his part. :)

  I never want the "hand-in hand" to end! Ever!

 Master carving by the Hubs!


My little Christmas painting on the shelves at Urban Barn. :)

 Let the Christmas movies begin...snuggling with my daughter 
watching the Grinch. 

Instagram now has online profiles. Come visit mine right here!


I hope your week has had a beautiful beginning!
Any fun holiday plans?

Thursday, November 15, 2012

Fall Tag Tutorial

2 comments


I am so thankful that Fall is upon us (and Christmas right around the corner-Yikes!) and today I thought I would share a mixed media Fall themed tag tutorial. Whoa, that's a mouthful! Lol. Anyways, this is the Make N Take tag that I lead last weekend. I thought it was quick, easy, fun, and the perfect thing to share. If you need a little fall pizazz for your table, tag for a gift, or a quick autumn decoration - here you go. :)


First get your tag (or anything really) and cover it with gesso by scraping the surface with an old credit card or gift card. I made some with plain white acrylic too and it worked just fine. The whole surface does not have to be covered.


1) Next, use the same card to spread some more fall colored paint over the card. Here I used Bronze Yellow from Liquitex and Cadmium Yellow from Americana. Move the card in all different directions to get a layered look. If you want to tone down the colors go back with some white.

2 & 3) After the tag dries, use a stencil to make some circles in Burnt Umber (also Americana). I made this stencil using an old manilla folder and a 1 inch circle punch. SO cheap and easy. I applied the paint using a make up sponge.

4) Use 3 torn pieces from an old book and place them in various spots around the tag. Glue them down using a glue stick or matte medium.


After securing the book pages down, cover each randomly with paint to help blend them into the background. Your fingers work best!


Type up, print out, and cut some fall themed words. Then use a permanent ink pad like StazOn and ink around the edges of each word. Set aside to dry. I used Timber Brown.


Use that same pad and stamp your butterfly. I love butterflies! They pop up everywhere...even in fall! :) I stamped one out completely and then stamped a few that hung off the sides. Some of the tags I left as is, while others I used white acrylic over the butterfly (once dry) to mute it a bit. Next, attach your words.


Finally, add some interest and doodles with a white Gelly Roll pen and black Pentel pen. I added some definition around each word, added white here & there, and doodled away. 
That's it! Quick, easy, festive, and fun!


I hope you enjoyed this tag tutorial!
Happy Creating!

Monday, November 12, 2012

Gratitude Tag Make & Take and Class Info

4 comments


Saturday was so much fun!
I spent the day at the Urban Barn in their creative classroom leading a Make n Take demo. I met lots of wonderful people, had a very helpful assistant (my mom!), and enjoyed exposing myself to new opportunity.
I also began taking sign ups for my new class at The Barn on December 1rst!!


We are going to be learning some amazing mixed media background and collage techniques. (I LOVE that learning how to make a background can then be used to make other pieces of art, gifts, cards, cool looks for scrap booking layouts, and so much more.) The project above is what we will be making! So darling!! Of course it is going to be festive, fun, and uber creative. The great thing is that the class is on the first weekend in December, so it will give you plenty of time to make more canvases as Christmas gifts. How great is that!? 
If you live in southern California...come join the fun!! The class only costs $40 and we will be painting our little hearts out from 12 to 3:00pm at the 
Urban Barn in Escondido.


I created a Workshop tab bar at the top of my blog so you can find my classes easily. This will be the first of many hopefully. :) Here are some more pics from the day...


New ornament hanging with my necklaces...

See my little 4x4 canvases among my friend Toni's GOR-geous things!

Thank you for looking! 
How was your weekend?


XO,