Showing posts with label art. Show all posts

Monday, February 2, 2015

2 Day Workshop with Christy Tomlinson : Studio Crescendoh

1 comments
Wow! What can I say? Last weekend I had an awesome opportunity to visit Studio Crescendoh in Santa Ana for a two day Workshop with Christy Tomlinson. It was simply awesome! Every single minute. I have to give a huge shout out to my Hubby who surprised me Christmas morning with the class. He heard me mention the workshop and knew I would probably not sign myself up. Certified shy girl has never taken a class in person. I am so glad that this was my first!


I have to say Christy is such a generous, sweet, encouraging, fun teacher! I adore her to pieces. I have taken several of her online classes (which I highly recommend) and it was so exciting to have her right there in person. 

The first day of the Workshop, Christy taught us how to put together a gorgeous journal using scrapbook papers, old calendars, envelopes, tags, and really what ever we wanted to add into it. I LOVE it! I thought binding books myself was a long drawn out process. That always discouraged me! Not now! I am going to make a bunch. Such a GREAT way to use up all my scrapbook paper that I hoard have. We also worked on several backgrounds with paint, stencils, and Gelli Plates. I had never used a Gelli Plate before, so playing with it was very interesting. On the second day we created a gorgeous cover with one of Christy's She Art girls. I collaged a lot with patterned napkins, which I don't normally use. I love the way my She Art girl's floral hair looks, so I will be hunting down some cool looking napkins!


I also loved Studio Crescendoh! What an amazing space. It is located in the art district of Santa Ana in a beautiful old building.  I loved the feeling it had. Inside the studio, I loved the large windows that brought in so much natural light and the GORgeous art of Jenny Doh that filled the walls. She is truly inspiring. I hope to take more workshops! She brings so many amazing artists to her studio to teach classes. Can't wait to return. :)


As a self proclaimed shy girl, meeting new people is always a bit nerve racking for me. BUT, I was so thrilled about taking the class the excitement took over & I felt right at home. Ha! Plus, all the girls taking the class were so warm and friendly. I was so lucky to sit next to the fabulous Kristen. We hit it off right away, which made the days even better. I met so many wonderful girls & artists. I am blessed!


I had a great time at Studio Crescendoh! I came home wanting to bind books & fling paint, completely inspired, and blessed with new artsy friendships. Such a wonderful weekend! Thank you Christy & Jenny (and my Hubs)!!

If you want to check out all the amazing artists visiting Studio Crescendoh click right HERE

Visit Christy right HERE!

Happy Creating,

Monday, August 4, 2014

Art Journaling with Stickers - mambi Monday

0 comments
I always LOVE adding words to my art journal pages. I don't always add words or quotes, but more often than not I feel the pages are not complete until they have words. One fun and easy way to do that is to use stickers. Now, I don't know about you - but I have a ton of stickers. It also doesn't help that my favorite place is the scrapbook aisles at Michaels.

Today I wanted to share some of the different ways I have used stickers in my journal. Since today is Monday, I thought I would use some fab mambi stickers. :)


On this page I created a background using acrylic paint and doodled with some pens (Pentel & Gelly Roll). I loved using my new favorite paint colors - Navy Blue & Gold. The Follow Your Heart is a clear sticker from me & my BIG ideas. These stickers come in black & gold too!! 


I can't wait to use more of these on my pages. I would suggest using some gel medium or Mod Podge under & over the stickers. Although they really stick well, this will help them stay put for the long run.


I have been wanting to use these super large letter stickers in my journal for a long time. I love their size! Of course they come in all sorts of fonts and patterns, but the ones I used today were plain white. Perfect! I could make them any color I like. First I painted them with two shades of blue. Once that was dry I painted some gold over top. To add a bit of depth, I went around th edge of each letter with my black Pentel pen and a light brown Faber Castell Artist PITT pen.


I think these letters would be perfect for a home decor sign or some subway art, don't you? Hmmm, maybe I need to add another project to my list. :)


Finally, I added this really cool Choose to be Joyful sticker to this sweet girl. I cut the sticker apart because I didn't like the way it looked on the page as one piece. Don't be afraid to whip those scissors out and snip away. 


Once the sticker was Mod Podged down and dried, I used my favorite black pen again to add some interest around the edge. I don't want the page to look like a completed page with a sticker slapped on top. I want the sticker to blend into the background. Using pen or more acrylic paint always helps!

There it is! Three pages, using three different kinds of stickers  - and making me super happy. :)

You can find the stickers I used right HERE

Happy Creating,

Friday, August 1, 2014

The Journey of the Mixed Media Mini

0 comments
Yes! The journey of the mini book. I call it a journey because it has taken me a bazillion years to get it put together. (well, maybe not quite that much...but you get the picture) I initially painted these cute girls like a mad woman on a mission. One page right after the other. I was inspired. Then they just sat...and sat...and sat. Does that ever happen to you? I mean, I guess I know inspiration can hit like a tornado and create intense focus. BUT, I didn't want to loose steam on my little whimsy girl book!

SO, today I wanted to share some of the pages. Each page is made from some recycled food boxes like cereal or crackers. I busted out a ton of backgrounds, having a blast playing with different mediums. Then I would sketch and work on the girl. Finally I added a quote, scripture, or words. 

When I started the book, it had been awhile since I had my hands messy with paint. It felt SOOOOOOO good to sling some paint again. :) Seriously... my art table is my Happy Place. 

Grace Girl
I love her pink hair. I love the words too. Don't you? True love never really works without giving other people grace. It's hard for sure. Sometimes they don't deserve it. Sometimes I really have to dig deep in order to give someone else grace. AND...they have to do the same for me. Thank goodness I have such amazing friends and family. :)

Truth Girl
Hmmm, more pink hair. Maybe it's the secret desire that I want cotton candy pink hair? I don't know. It always shows up on my girls. Hmmm, maybe a pink wig for Halloween. 


Believe Girl
This sweetie is a bit different than the others. I just went with it. I was feeling something quirky. The great thing about doing a book like this - all faces - I really got a chance to play, try things, and enjoy my creative time. 

Dream Girl
Her dreams were BIG. Oh, yes! Don't you love that? I am no stranger to massive self doubt. SO the thought of BIG, monstrous, scary dreams makes my stomach quiver. In a good way though. You know the "loose sleep because I am so excited" kinda way...Or the "shout from the mountain tops" kinda way...the scary good way. :)

Loved Girl
She is my favorite. I love the way she turned out. She gets simple words. But, words that are so important. I have to remind myself all the time. That despite my faults & numerous imperfections - I am enough & I am loved. 

And, so are you...
Enjoy your weekend Lovelies!

Happy Creating,


Saturday, May 31, 2014

Prepping for The Summer of Color 4

1 comments
I can believe that on Monday, The Summer of Color 4 hosted by the very talented Kristin at Twinkle, Twinkle is beginning! Seriously, the fourth year! I say that because first of all, it seems crazy that I have had a blog that long.
:)


So this weekend I am preparing for the color goodness to begin. If you don't know about the SOC, it is a free 6 week event where each week there is a fabulous color challenge. (Info about it RIGHT HERE) I was not sure how I wanted to complete each week's challenge. So I just started pulling out a couple different choices. I vowed to myself that I would not buy anything new to house all my creative play in. I had to use what I had!! 

Hmmmm...an altered book, chipboard mini album, loose watercolor paper, a spiral journal, junk journal. It took me a bit to finally decide and I can't promise that I won't change my mind either. Come back when SOC4 kicks off to see what I decided!! :)


Summer of Color is really fun and I have enjoyed the past 3 years.  Here are a few pictures from the past.

 Read about it HERE


Read about it HERE

Read about it HERE

These are just a few from The Summer of Color 2. The great thing about this event is that Kristin welcomes all kinds of creativity - mixed media, scrapbooking, card making, jewelry, ATCs, photography, art journaling... anything really!! Plus, a little added bonus - there are giveaways each week. It is going to be so ridiculously fun! COME join the COLOR FUN if you haven't already!  

Happy Creating!

Sunday, May 4, 2014

A Whimsy Girl Mixed Media Mini Book

0 comments


Oh, how I have missed painting whimsical mixed media girls! It has been months. Months! I was feeling super inspired after seeing so many lovely faces on my Instagram and Pinterest feeds (I have SO many artsy, creative friends) that I just needed to sit and paint.

I started painting and just couldn't stop. :) I guess that is what happens when inspiration hits. I decided that I would make a mini book filled with all the girls. I grabbed my bin of cut down pieces of thin cardboard from food boxes. Like I have mentioned before, I like to break down old food boxes like crackers, cereal, and pasta. I put them in a bin close to my studio table. I throw junk mail in there too. It is great for grabbing easily and painting on. 


To help my creative flow move along easily, I like to create several backgrounds all at once. I like to do this especially if I am making a mini book. I work on a bunch of backgrounds all at one time and then I can pull one out at any time to finish. I use the shapes in the backgrounds to inspire the figures I sketch out. It always amazes me to see the different pictures that can be found. 


Along with each mixed media girl, I am using a quote and adding it to the pages also. Happy words...inspiring words...positive phrases...scriptures - just whatever I am feeling at that moment.


I will be back soon when my mixed media mini book is all finished and show you how it turned out! If you want lots of little peeks along the way, please come follow me on Instagram @sadieinspired


Happy Creating!

Saturday, February 22, 2014

Mixed Media Flowers in the Studio

0 comments
 
I don't know about you, but I think I am ready for spring. I am in the mood for cheerful colored nail polish, birds, nests, sweet little happy projects added to my house, flowers in bloom, and sandals. In southern California winter does not last that long, so it is already feeling like spring. Today it is 75 degrees with some clouds. :) I do LOVE the crisp, cold weather of winter...but, after Valentine's Day passes I am ready for the hearts, pinecones & winter décor to come down. I am ready for the flowers to start popping out everywhere! What about you?
 
Flowers are dominating my creative creations right now too...big, playful, sketchy flowers.
I love them.
 
 
My favorite background collage material lately = my daughter's school papers. Such fun use for them. It beats the recycle bin. When her papers come home, I sort them into 4 places - recycling, special papers to save, a bin for our Project Life albums (scrapbook layouts/mini books too)  and the rest go into a drawer in my art studio for projects. I LOVE seeing her writing pop through on my canvases or journal pages. There is something so sweet and refreshing about kiddie writing!
 
 
I hope you are having a beautiful weekend! I am sure I will find time to spend at my studio table where undoubtedly more happy flowers will appear. :) What are you looking forward to right now?


Monday, February 3, 2014

mambi Mondays - Mixed Media Heart Canvas

2 comments


I am super excited to start a new series on my blog today!! 

mambi Mondays
Yiiippppee! Every Monday I will share a project using some me & my BIG ideas goodies. I might create a canvas (like today), layouts, crafts, home decor, gifts, cards, journal pages, etc. Super fun, right? Of course, I LOVE mixed media so I started things off with a Valentine's Day inspired canvas.

Enough rambling...let's get to it.

I started with a 10 x 10 wooden canvas from Michaels. I have to say these wood canvases are my absolute favorite. First of all, they are only $2.49 each. Awesome! It is not a flat panel either. It has a small ridge all around the back so it is ready to hang. YES! Who wants to bother with adding that stuff. 
I want to make...then hang! :)

I covered the entire surface with some vintage sheet music from my stash with Mod Podge. Hold on... Let's take a little bubble diversion - don't sweat them. If you have even adhered paper (any kind) to any given surface with gel medium or Mod Podge, then you know you are going to face trying to get as many air bubbles out as you can. Is it a constant battle for you too? My solution - accept that the surface MAY not be completely flat AND love the texture those bubbles later create. I put Mod Podge on the surface and the back of the paper, plus I also use an old gift card to squeeze out as much glue as possible. BUT, whatever is left behind - I don't sweat it!


After it was dry, I added gesso and two shades of aqua craft paint mainly with my fingers. I didn't want to cover the entire surface of course. I definitely wanted bits of music popping through. Luckily, this particular piece of music was a love song, so it had the words love, or I love in several different places. I highlighted those by circling them. I also used a circle stencil (from an old board game) and white paint to add layers to the background.


I set the canvas aside to dry and began looking through my collection of me & my BIG ideas paper. I found a little bit of everything to use. The paper used was from 12 x 12 pads, CARDS in an INSTANT and POCKET PAGES cards. There are so many fun patterns to choose from. I had some small wooden hearts (from Michaels) that I wanted to use as the base for each heart. I used a heart as a template and traced out a different pattern for each one. The bottom right side of the grid does not have a heart because the words "I love" were already there from the sheet music. I added "you" with some small mambi ABCs.


Finally, the finishing touches were added using various mambi stickers. Again I used a little bit of everything. It turned out so, SO cute. I already hung it up in my entryway! :) This would make a totally cute Valentine's Day gift (or any occasion) for someone special. Also, the wooden hearts could be replaced with cardboard pieces you cut yourself or some chipboard. So many different ways it could turn out.


 PS I am a me & my BIG ideas Design Team member. I have the honor of working with some very talented ladies. Please come visit the mambi blog so you can see what they have been up too! 


Happy Creating!

Sunday, July 7, 2013

Summer of Color - Pink and Gray

3 comments


 I was super excited when I saw that Week 4 of Summer of Color 3 would be the beautiful color combination of Pale Pink and Charcoal Gray. So GOR-geous together, right? I guess I am not the best person to ask because I may have a mild obsession with gray. I love it with yellow, aqua, coral, black, minty green, and so on. If you were to look in my closet, you would see an ocean of black, gray, and patterns with those colors. There are splashes of color, but I usually gravitate to gray. :) SO, back to the challenge. I thought with this combo that this week's creation would be a piece of cake. Super easy. Super fast. Super fun. Ha! Super wrong!

I started off wanting to do something large, abstract, and on a canvas. But, ended up in all different directions having a very difficult time. I jumped into my journal - stuck. I worked on a mini 4x4 canvas - stuck. The creative mojo just wasn't flowing. So, what do you do when struggle finds you? Me? I walk away for a bit. That is exactly what I did. I left all my artsy tools right there on my desk and scrubbed my house from top to bottom caught up on the Real Housewives (I know, sorry. I can't help myself), played pirates with my little man, and found all kinds of other things to do. :)


After a few days I decided to give it another try. I sat at my table and like magic, my hands started working. This time I went to work on a small cardboard piece I had sitting in my collection. I worked for about 30 minutes straight and I was done (not including drying time). I let go of the abstract that I wanted to create and went with what I am familiar with. Sometimes, having a specific picture of exactly what I want already in my head hinders me. Does that happen to you? I think I try so hard to get the masterpiece in my head onto the canvas...and then when it starts to look different... I get frustrated or begin negative self talk. We all know that is NO good. So, I am glad I was able to work it out on this little cardboard piece. I will attempt that abstract on another day. :)

Come see the other pink and gray creations right here at Summer of Color 3, hosted by the lovely Kristin from Twinkle Twinkle.


Saturday, June 8, 2013

Happy Flowers & The Color of Summer 3

2 comments


Whoa! I can't believe how long I have been away from my little creative home here at Sadie Inspired. I just couldn't get my blog writing mojo going. :) Creativity has been flowing...a few canvases, art journal pages, home projects, and working on this year's (and last year's) Project Life album. I just needed a bloggy break.

I worked on this little happy flower canvas this last week as we celebrated our final week of school. Summer is officially here in our house, and I am beyond happy about that! Do you have any big summer plans? We have a very mellow summer planned with lots of trips to the pool, visits to the beach, lazy mornings, baseball games, flip flops, and watermelon. Hopefully lots of painting and crafting too!


Another fabulous addition to my summer will be The Color of Summer 3 - Artist's Choice, hosted by Kristin at Twinkle Twinkle. It is a free bloggy event that is super inspiring and loads of fun. If you paint, craft, scrapbook, art journal, sew, take pictures, or anything creative... you should come over and join in. This will be my third year participating and I am looking forward to it. Summer of Color has just started and you can read about it RIGHT HERE. Oh, wait...did I mention there are prizes involved too? As if a big color celebration isn't enough...prizes are involved! :) So, if you haven't popped over to 
Twinkle Twinkle already - GO!


 Besides enjoying the days of summer with my family, joining in the artsy fun at SOC 3, preparing new pieces for my shop, and tackling some crafty projects around my house (which I will be sure to share here)...I also will be revamping the blog a bit. It's time. I want my blog to fit where I am creatively. It is an ever changing process and journey, right? There are so many things I am interested in artistically and I want this space to reflect that! So be on the look out for that. Yay! :)


Last order of business - my Reader. I read all your fabulous blogs in my Google Reader. I had heard that as of July 1 Google was going to be taking that feature away (Boo). I was preparing for that, but my Reader has already disappeared. Poof! Gone. Did that happen to anyone else? Needless to say I am going to be making a transition over to Bloglovin' unless I find something else. What do you use to read your blogs? Any suggestions?


Don't forget that you can always find me on Instagram @sadieinspired.
I hope you are having a beautiful weekend!


Saturday, May 11, 2013

Altered Shadow Box Canvas

2 comments
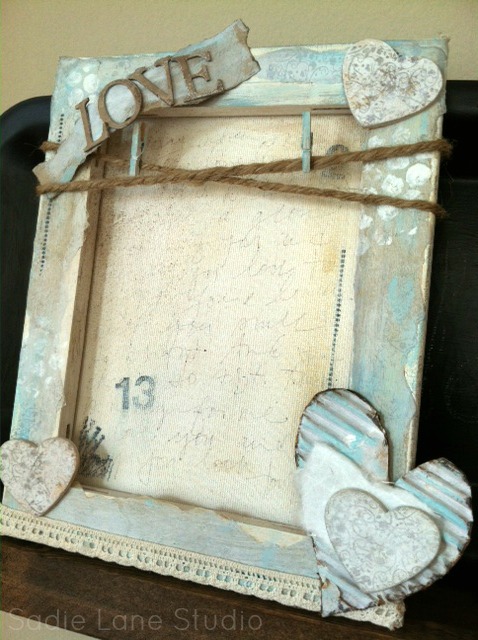
I always love finding creative, fun ways to display pictures. I have a gazillion photos on my computer. My kids are so dang cute I can't help myself and I just love taking pictures. So it has been my goal to get those pictures off the computer and seen - whether in albums or on the wall. I also love, love, love how some artists mix photos with altered canvases. So, I thought it would be super fun to turn a standard canvas around and use the back like a shadow box. I thought if I wrapped twine around the top, it would be perfect to hang a picture with tiny clothespins.


I wanted to have a very shabby, neutral, soft look to the finished frame. So I used lots of white, cream, browns, and light aqua. The first thing I did was cover the outer edge with brown scrapbook paper using Mod Podge. Once that was dry, I painted it with the various shades I mentioned and did some stamping too. I set the canvas aside to dry and worked on the little piece above. I tore a piece of scrapbook paper to the size I need, inked the edges with Distress Stain in Walnut, and added some paint with my good ol' fingers. I added some stamping and paint to the chipboard letters as well. These were from a Tim Holtz collection of chipboard letters I had found on clearance. Yippee for red clearance stickers! :)


Then on the inside I used a waterproof black pen and wrote some words. You could write a poem, a sweet love note, or a favorite quote...anything really. It really is for visual texture and sentiment. I painted over the words with white acrylic and gesso. Not all the words are completely visible, but that creates such pretty texture. I added stamps too.


For the hearts I used some small wooden ones I had in my stash. I stamped them with a patterned stamp in Walnut, then painted over them with gesso. For the larger heart on the bottom right corner, I attached one of the wooden heart to a larger one that had been cut from an old box. Gotta love using recycled stuff, right!? Before gluing the pieces together, I added a small piece of cream colored fiber paper to the back.


Now it was time to glue it all together. I took all the pieces and used E6000 to secure all the various parts. I painted some mini clothespins (adorable!) with aqua acrylic paint and tied some thick twine around the canvas. I used some adhesive cream lace along the bottom. I find these at Michaels on rolls. I love that all I have to do is peel and stick!

 
Now all I had to do was add a cute picture. Adorable!!


I had a great time making this altered, shadow box canvas and I can't wait to make another one! I hope you are having a beautiful weekend!

Happy Creating,