Showing posts with label mixed media. Show all posts

Thursday, February 12, 2015

DIY LOVE Canvas from CHA 2015

2 comments

It's almost that time...Valentine's Day. In celebration of all the hearts and love floating about, I wanted to share a canvas I made for CHA 2015. This canvas was on display in the me & my BIG ideas booth and I was SUPER excited to see it in person. 

I made this heart inspired canvas after I fell in love with the paper from the mambi Straight to the Heart paper pack. I mean...wood grain, I love you repeated over & over in cursive and this darling heart paper. I was done. Swoon! 


Here is what I used: canvas, modeling paste, doilies, mambi Jumbo Gold Rush Alphas, Mod Podge, vellum, hot glue, Straight to the Heart paper, mambiSTICKS, and wood coasters.


I really loved how it turned out. I liked the contrast between the white & gray that I used with the gold. The little pops of red look great too. I love that the red is a super pretty muted red, not an in your face brick red. It worked well with this piece. 

This type of project doesn't have to be just for Valentine's Day either. What about a DIY Anniversary or Wedding gift for someone? Perfect right! I know I always love receiving gifts that someone made for me. Just gives the present a little bit more of love & magic. 


Happy Creating Friends!

Sunday, May 4, 2014

A Whimsy Girl Mixed Media Mini Book

0 comments


Oh, how I have missed painting whimsical mixed media girls! It has been months. Months! I was feeling super inspired after seeing so many lovely faces on my Instagram and Pinterest feeds (I have SO many artsy, creative friends) that I just needed to sit and paint.

I started painting and just couldn't stop. :) I guess that is what happens when inspiration hits. I decided that I would make a mini book filled with all the girls. I grabbed my bin of cut down pieces of thin cardboard from food boxes. Like I have mentioned before, I like to break down old food boxes like crackers, cereal, and pasta. I put them in a bin close to my studio table. I throw junk mail in there too. It is great for grabbing easily and painting on. 


To help my creative flow move along easily, I like to create several backgrounds all at once. I like to do this especially if I am making a mini book. I work on a bunch of backgrounds all at one time and then I can pull one out at any time to finish. I use the shapes in the backgrounds to inspire the figures I sketch out. It always amazes me to see the different pictures that can be found. 


Along with each mixed media girl, I am using a quote and adding it to the pages also. Happy words...inspiring words...positive phrases...scriptures - just whatever I am feeling at that moment.


I will be back soon when my mixed media mini book is all finished and show you how it turned out! If you want lots of little peeks along the way, please come follow me on Instagram @sadieinspired


Happy Creating!

Monday, April 28, 2014

Highlighting Memories with Mixed Media & mambi

1 comments

There are two things I REALLY love. I mean...reeeeaaalllly. I adore pictures and mixed media. Taking pictures and sitting at my studio table are both complete happy places for me. Besides spending time with my family and friends...these two things make my heart happy. You can totally insert Pharrell singing "Happy" right here. That's how much I love them. :)


So today's creative project merges the two beautifully. I keep a collection of pictures that I know eventually I want to create something special with. It may be a journal page, a mini album, framed for the house, or a special page in one of my Project Life albums. Today I used a scrap piece of cardboard and turned it into a bright, happy (there's that word again) mixed media scrapbook layout. I love the way it turned out and can't wait to make some more.

I used the cardboard for the base of a mixed media background. I loved using aqua, yellow, white, and coral paint. Talk about a pretty color combination. Eeeeekkk! I adore it! There is some watercolor crayon and Faber-Castell PITT pens on there too. I also used some random objects from my "stamping" drawer, which is just a drawer full of things that make fabulous shapes on your paper. The white circles were stamped with an old roll of something.


Once I had the background done the rest was a cinch. The me & my BIG ideas paper pads have SO many beautiful, cheerful patterns to chose from. I just found some that I felt went with the color scheme and began layering them together. I found the mambi friends sticker in my stash and loved how the orangey (I don't think that is a word, but let's go with it) coral color popped off the page. 


Look how great the word FABULOUS looks too! That is actually a clear sticker from this pack right HERE that I backed on paper. All I did to finish it off was to add some journaling and stamped it a bit up top using a Dear Lizzy stamp. 

I hope you are having a wonderful start to your week!
Happy Creating,

Saturday, February 22, 2014

Mixed Media Flowers in the Studio

0 comments
 
I don't know about you, but I think I am ready for spring. I am in the mood for cheerful colored nail polish, birds, nests, sweet little happy projects added to my house, flowers in bloom, and sandals. In southern California winter does not last that long, so it is already feeling like spring. Today it is 75 degrees with some clouds. :) I do LOVE the crisp, cold weather of winter...but, after Valentine's Day passes I am ready for the hearts, pinecones & winter décor to come down. I am ready for the flowers to start popping out everywhere! What about you?
 
Flowers are dominating my creative creations right now too...big, playful, sketchy flowers.
I love them.
 
 
My favorite background collage material lately = my daughter's school papers. Such fun use for them. It beats the recycle bin. When her papers come home, I sort them into 4 places - recycling, special papers to save, a bin for our Project Life albums (scrapbook layouts/mini books too)  and the rest go into a drawer in my art studio for projects. I LOVE seeing her writing pop through on my canvases or journal pages. There is something so sweet and refreshing about kiddie writing!
 
 
I hope you are having a beautiful weekend! I am sure I will find time to spend at my studio table where undoubtedly more happy flowers will appear. :) What are you looking forward to right now?


Monday, February 3, 2014

mambi Mondays - Mixed Media Heart Canvas

2 comments


I am super excited to start a new series on my blog today!! 

mambi Mondays
Yiiippppee! Every Monday I will share a project using some me & my BIG ideas goodies. I might create a canvas (like today), layouts, crafts, home decor, gifts, cards, journal pages, etc. Super fun, right? Of course, I LOVE mixed media so I started things off with a Valentine's Day inspired canvas.

Enough rambling...let's get to it.

I started with a 10 x 10 wooden canvas from Michaels. I have to say these wood canvases are my absolute favorite. First of all, they are only $2.49 each. Awesome! It is not a flat panel either. It has a small ridge all around the back so it is ready to hang. YES! Who wants to bother with adding that stuff. 
I want to make...then hang! :)

I covered the entire surface with some vintage sheet music from my stash with Mod Podge. Hold on... Let's take a little bubble diversion - don't sweat them. If you have even adhered paper (any kind) to any given surface with gel medium or Mod Podge, then you know you are going to face trying to get as many air bubbles out as you can. Is it a constant battle for you too? My solution - accept that the surface MAY not be completely flat AND love the texture those bubbles later create. I put Mod Podge on the surface and the back of the paper, plus I also use an old gift card to squeeze out as much glue as possible. BUT, whatever is left behind - I don't sweat it!


After it was dry, I added gesso and two shades of aqua craft paint mainly with my fingers. I didn't want to cover the entire surface of course. I definitely wanted bits of music popping through. Luckily, this particular piece of music was a love song, so it had the words love, or I love in several different places. I highlighted those by circling them. I also used a circle stencil (from an old board game) and white paint to add layers to the background.


I set the canvas aside to dry and began looking through my collection of me & my BIG ideas paper. I found a little bit of everything to use. The paper used was from 12 x 12 pads, CARDS in an INSTANT and POCKET PAGES cards. There are so many fun patterns to choose from. I had some small wooden hearts (from Michaels) that I wanted to use as the base for each heart. I used a heart as a template and traced out a different pattern for each one. The bottom right side of the grid does not have a heart because the words "I love" were already there from the sheet music. I added "you" with some small mambi ABCs.


Finally, the finishing touches were added using various mambi stickers. Again I used a little bit of everything. It turned out so, SO cute. I already hung it up in my entryway! :) This would make a totally cute Valentine's Day gift (or any occasion) for someone special. Also, the wooden hearts could be replaced with cardboard pieces you cut yourself or some chipboard. So many different ways it could turn out.


 PS I am a me & my BIG ideas Design Team member. I have the honor of working with some very talented ladies. Please come visit the mambi blog so you can see what they have been up too! 


Happy Creating!

Friday, October 11, 2013

Faux Flair Friday #2 - Mixed Media Embellies

1 comments
Remember last week when I had a blast making darling little flair buttons using epoxy stickers and some of my favorite patterned paper. Well, this week I have been doing more of the same. Except this week I have been busting into my paint, watercolors, stamps, markers, and Mod Podge to make these cute embellishments. Using paint and your own created art makes them SO versatile! Look at how easy they are to make!


I grabbed some watercolor paper from my stash and began making a mixed media background. You could use some light colored card stock, but watercolor paper will hold the wet media much better. I added book text with some gel medium, doodled with my Faber Castell PITT pens, added inexpensive watercolor, watercolor crayons, stamped, stenciled, and just had fun. The most important thing is to have fun, right? Don't worry about making a mistake. Just mark, doodle, smoosh (is that a word?), swipe, scrape, drip, smear, dot, and create to your heart's content. When you're finished, stand back and admire your beautiful work.


After I let my pages dry for a bit, I punched some one inch circles out. I sorted through them and chose my favorites. Like last week, some I left plain and others I added words for variety. 


I carefully added the epoxy stickers on top and rubbed the back to completely adhere the paper. I just love how they turned out. They will certainly make a pretty layer on a scrapbook layout, journal page, card, tag, or canvas. LOVE them!


I am starting to grow a wonderful collection of these creative little goodies, so I better get busy making some projects! What are you working on? Do share! I'd love to hear all about it. Better yet, leave me a link so I can come visit. :)

Next week, I will be back with some washi buttons. Cute! Who has oodles of washi? I know I do. Let's turn them into some fabulous faux flair!

Happy Creating,
(You can read last week's post right HERE)

Sunday, June 30, 2013

New Art Journal Pages

2 comments
Happy Sunday Friends! How are you all doing? I am trying  my best to not melt in this heat wave we are having. I love a little sunshine for sure, but uncomfortable heat - NO thank you! :) But... it does give me some time for creating which is a definite plus in my book. I am so close to finishing up my 9x12 Strathmore Visual Journal!! I am determined to complete it this summer!! No excuses. I just need to keep my artsy mojo flowing and get to my studio table a bit every day. My creative focus this month: happy canvases for my shop, finishing my journal and keeping up with Project Life.

This last week I finished this little cutie. I had already glued down a bunch of extra little bits I had laying around onto the page. I like doing that because I have an immediate jumping off point. I open up my journal and I already have a page started. I threw down some gesso, got out a bunch of bright, cheerful acrylic paint, and I was off. Her face came out of the background after several layers. I didn't really plan to do a portrait (I can't seem to stop!), but she happened. :)


I love the swirly textured card on the right side of her dress. It was a piece of a small note card I had been given. The texture of the card really looks beautiful and the gesso I used lightly over top picked up the edges. SO cool! Of course I felt that my girl needed some words. "She found beauty anyway" fit the way I was feeling perfectly. This phrase was from an old print out from The Brave Girls Club Soul Restoration class I took a couple of years ago.

I really like the way my other page turned out too. It was another page in my journal that already had some color on it. I had used this page to wipe off excess paint as I worked on other things. As I was adding gesso and my favorite acrylic colors like pinks, aquas, and yellow...a bunch of interesting house shapes began to show up. I love that they were going every which way and had different shapes to them.


To add a bit more texture I used some modeling paste through a stencil and just wiped some on the page using a popsicle stick. I had some chipboard pieces that I painted with gesso and silver paint. I used some gray Staz On to bring out the raised design on each piece. I attached them to the houses using E6000. Finally I added the words...my home sweet home. I absolutely LOVE being at home with my family. It is such my happy place. My wonderful kids, amazing Hubby, and sweet dog make all things right in the world. This page reflects exactly what my heart feels. :)

I am looking forward to tackling my creative goals this next month. 
Can you believe it is already July! Yikes! (Grab hold because time is flying!!)  
What creative goals are you working on lately?

Saturday, May 11, 2013

Altered Shadow Box Canvas

2 comments
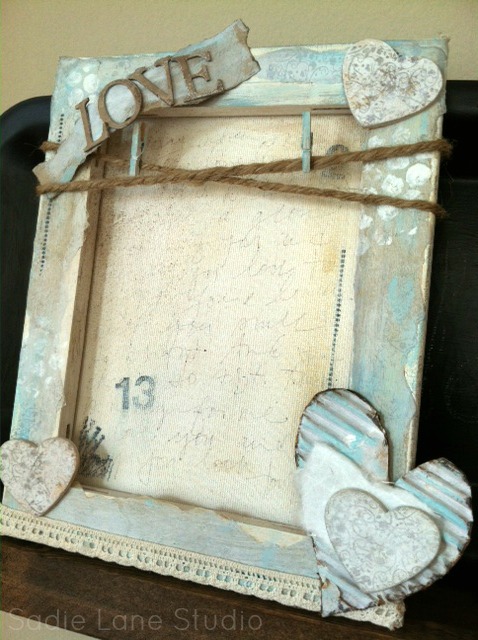
I always love finding creative, fun ways to display pictures. I have a gazillion photos on my computer. My kids are so dang cute I can't help myself and I just love taking pictures. So it has been my goal to get those pictures off the computer and seen - whether in albums or on the wall. I also love, love, love how some artists mix photos with altered canvases. So, I thought it would be super fun to turn a standard canvas around and use the back like a shadow box. I thought if I wrapped twine around the top, it would be perfect to hang a picture with tiny clothespins.


I wanted to have a very shabby, neutral, soft look to the finished frame. So I used lots of white, cream, browns, and light aqua. The first thing I did was cover the outer edge with brown scrapbook paper using Mod Podge. Once that was dry, I painted it with the various shades I mentioned and did some stamping too. I set the canvas aside to dry and worked on the little piece above. I tore a piece of scrapbook paper to the size I need, inked the edges with Distress Stain in Walnut, and added some paint with my good ol' fingers. I added some stamping and paint to the chipboard letters as well. These were from a Tim Holtz collection of chipboard letters I had found on clearance. Yippee for red clearance stickers! :)


Then on the inside I used a waterproof black pen and wrote some words. You could write a poem, a sweet love note, or a favorite quote...anything really. It really is for visual texture and sentiment. I painted over the words with white acrylic and gesso. Not all the words are completely visible, but that creates such pretty texture. I added stamps too.


For the hearts I used some small wooden ones I had in my stash. I stamped them with a patterned stamp in Walnut, then painted over them with gesso. For the larger heart on the bottom right corner, I attached one of the wooden heart to a larger one that had been cut from an old box. Gotta love using recycled stuff, right!? Before gluing the pieces together, I added a small piece of cream colored fiber paper to the back.


Now it was time to glue it all together. I took all the pieces and used E6000 to secure all the various parts. I painted some mini clothespins (adorable!) with aqua acrylic paint and tied some thick twine around the canvas. I used some adhesive cream lace along the bottom. I find these at Michaels on rolls. I love that all I have to do is peel and stick!

 
Now all I had to do was add a cute picture. Adorable!!


I had a great time making this altered, shadow box canvas and I can't wait to make another one! I hope you are having a beautiful weekend!

Happy Creating,

Friday, May 3, 2013

me & my BIG ideas Pocket Card Canvas

0 comments


I love the me & my BIG ideas Pocket Pages cards. Have you seen them? I have been spotting them everywhere on Instagram and they have been making their way into my cart when I go to Michaels. They are super affordable ($4.99 for 72 cards plus my 40% off coupon - score!) and perfect for Project Life. I have gathered quite a few different packages to use on my album and my daughter's (Yep! She is making her own mini album). I am seriously in love. 

With summer looming around the corner, I really wanted to add a splash of color to our mantle in the family room. This room is in the back of the house and can get pretty dark. It doesn't get the best light, but in the heat of the summer the lack of direct sun keeps it cool. I however, love the front of the house that gets a lot more light. Which leads me to the need to bring some sunny into the family room. Easy, quick solution - use a bright, cheerful mambi card. So I thought using one of the yellow 4x6 (they also have 3x4 in the package) in a mixed media canvas would be perfect. The best part is that I used the packaging that the cards came in for the back! Let me show you how you can make one too!!

 Here are the supplies I used :
  • One 4x6 card from me & my BIG ideas POCKET PAGES Themed Cards (Michaels)
  • POCKET PAGES packaging (Woot! Better than the recycle bin!)
  • various washi tapes in yellow 
  • book pages
  • tape runner adhesive
  • Tim Holtz Distress Ink in Frayed Burlap
  • Staz On - Jet Black
  • Small butterfly stamp
  • Paper flowers from stash
  • Various trims in aqua
  • White Unibal Signo
  • Enamel Dots from My Mind's Eye (The Sweetest Thing collection)
***Not pictured : Americana acrylic craft paint, Liquitex gesso, and Mod Podge
Also, the pocket pages come in several different themed packages. I have several different ones and I am not sure which one this card came from. But, the package shows all the various cards on the back. How nice is that!?


First, use the back of the packaging and glue book pages to the surface with Mod Podge. Remember to use the glue under and over. Apply a good amount to the surface, then the back of the paper. Once it is down use an old credit or gift card to press out any air bubbles. Repeat this process until the entire paper is covered.


After it dries add a layer of gesso. Let that dry too. Then use paint and create a fun background. I like to use credit cards, a brayer, and my fingers to create variety and texture in the background. I added the yellows for a pop of color and tie the card into the background.


Add more layers with stamps and pen. I adore my white Unibal Signo. It writes like a dream and I love adding words or marks to the background. I use this tiny butterfly stamp all the time. It is so cute.

I know most of the center portion of this will be unseen under the card. So I didn't worry much about it. I did feel that the edges around the outside needed a little distressing. So I pulled out my Frayed Burlap and used it all around the outside. I was going to distress the edge of the card too, but changed my mind. 


While I let the back piece dry, I added some washi tape to the actual mambi card to jazz it up a bit. Who doesn't love a bit of washi tape, right? :)


Next, I used an adhesive tape runner and attached the card to the canvas. I wanted to tie the blue in the background with the card (which is very yellow) so I spotted some aqua trim I had picked up awhile ago from the $2 bin at Michaels (really. I don't go there that much. No, really. Ha!) I tied it around the entire canvas. It was just the right amount of blue. :) I hot glued three paper flowers from my stash onto the corners. Then popped in a My Mind's Eye enamel dot in each center. I was going to use a button, but the enamel dots looked so awesome.

That's it! How fun was that!? There are so many different cards in these packs, so there is so much that you can do with them. I already have ideas for more, so I will be sure to share them!! All I know is that my mantle will now have a perfect amount of sunshine to welcome in summer.


I hope you have a beautiful sunshine-filled weekend!
Happy Creating,

Thursday, January 24, 2013

One Little Word - 2013

12 comments
Oh my goodness it has taken me a long time to choose a word for 2013. I thought I would pass on choosing one this year. BUT, I started reading all the posts about your motivating words. Inspired! I just can't help it. You are all just so inspiring! The same thing happened last year too. :) I felt that since I had a word last year and the year before - why stop now. Right?

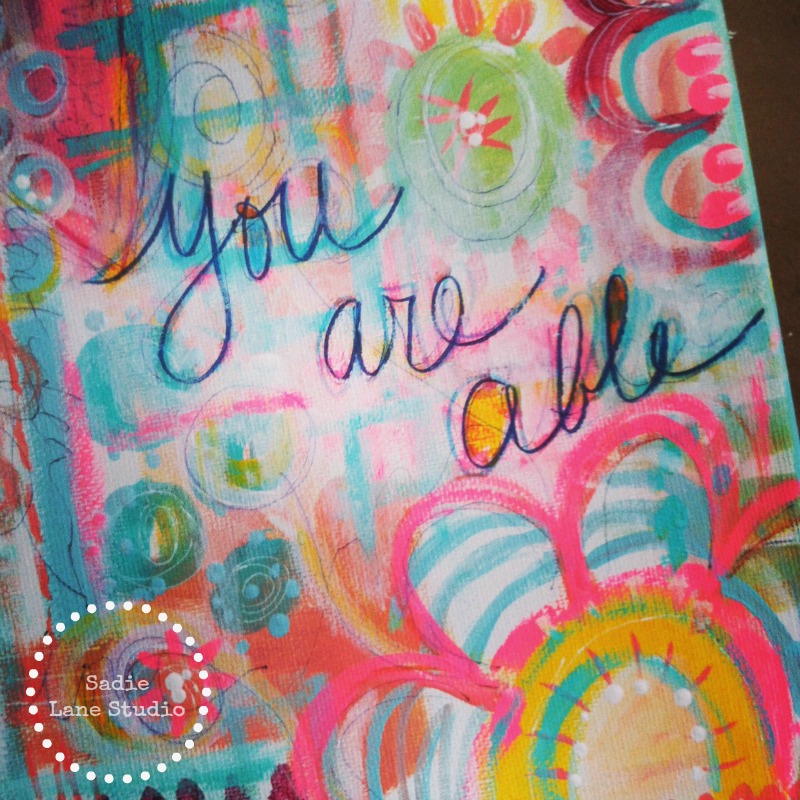
8 x 10 Mixed Media Canvas - Acrylic paint & various pens
The hard part was narrowing down my choices. Uggg! I can be super indecisive sometimes and this being the 24th of January is a prime example. Ha! I had  basically narrowed it down to embrace or able. Embrace seemed a little more romantic, and beautiful - but the word able would not leave me alone. I have read several blog posts about the words sometimes choosing you. I think mine found me. It just wouldn't go away. It kept popping into my head. 

A couple weeks ago, my family and I were driving up to the mountains to go snowboarding (I apparently need waaay more practice). Right along the snowy mountain, nestled back a bit in a glistening white field was a small, weathered shack with huge letters painted above the door - A B L E. Now, believe me the blogger and picture taking fool that I am wanted to jump out and take a  picture...but, we were with people in a little caravan and I didn't think we could. Lol. Needless to say it made me smile to see that word sitting there for me. :)


 Finally a couple of nights ago I committed to my word of 2013 - when I painted this in the middle of a sleepless night. 

You are able
 I am able
We are able

...to do anything we put our minds to, even if I start with one step at a time.

Believe in yourself and know that you were wonderfully made...
just the way you are.

This is an Instagram from a couple days ago. If you are Insta-obsessed 
like me, come find me @sadieinspired!

I can do all things through Christ who strengthens me.
Philippians 4:13 


StudioJRU

Thursday, January 17, 2013

New Mixed Media Workshop at Urban Barn!

2 comments
I am super excited to announce another Workshop coming in February at the Urban Barn in Escondido, Ca. During this mixed media class I am going to be teaching various techniques that add texture and interest to a canvas. We will be using pen, ink, tissue paper, modeling paste, cardboard and tape. So fun! The project we will be working on has a love theme because the class in on the 9th of February - 
a couple days before Valentine's Day! 

This layered canvas is perfect to create for your home or give as a gift to a special someone. :))) I am sure we are going to be painting up a storm, laughing a lot (always), eating chocolate (how can we not??) and learning some great techniques.

If you are in the southern California area...come join us! I'd love to see your sweet face. :) We are bound to have a super creative time!!

Layers of Love Mixed Media Workshop
Saturday, February 9, 2013

***UPDATE: CLASS CANCELED


Sunday, October 9, 2011

Moments

15 comments
WIP
 I had to find little bits of fleeting moments to create this week.
My "studio" is in an upstairs loft area in our house.
There is no door to shut, so every time I walked by, 
my gorgeous art supplies kept calling to me.
"Come play with me."  :)

I promise this week I will carve out more time to play.


I did get started on some pieces. I used some wooden plaques that I picked up from Michaels this summer. I love that it already had wire for hanging & a frame. Plus, I really LOVE painting on wood. Do you?? If you do, what kinds of wood do you use? I don't know what it is about the wood, but I think it is my favorite thing to paint on.

WIP...not sure which word to use
I am very excited to be working on lots of little goodies to restock my Etsy shop too. I am a little rusty with Etsy so any prayers would be greatly appreciated...lol. If you have any suggestions - I would love it!!

I hope you have had a wonderful weekend!
Jen :)

I am joining some very talented artists at Studio JRU's "in the studio" 
I am very happy to be in the company of such inspiration!