Showing posts with label DIY. Show all posts

Wednesday, March 25, 2015

A DIY Spring Wire Board

2 comments

Yay! It's Spring! I really do love the cold & coziness of winter, but I am ready for everything springtime. How about you? 

So, in celebration of the new season, I'd like to share one of the projects I made for CHA 2015 in Anaheim, CA back in January. This darling DIY board was on display in the me & my BIG ideas booth. It started as just a plain wood square with chicken wire in the center. After adding some mambi paper, stickers, and embellishments it had a whole new life. :)

Here are the steps I took to fancy it up. I am sure you can still find the plain wood base in a craft store near you. (I found mine at Joann's.) 

First, I painting the wood edge with white acrylic paint. After it dried, I added pink and white chevron border stickers from mambi to the sides. I placed some Mod Podge on top of each sticker to make sure it didn't go anywhere. (I also added Mod Podge around the rest of the sides so the finish was the same)

While that was drying, I began working on making paper flowers using various pieces of 12 x 12 paper. I like my flowers to look varied and unique. In other words, I just start cutting random flower shapes and hope they turn out OK! :) 


See, I just cut flower shapes by hand and then continue to cut smaller ones to set inside. I rough up the edges a bit and then hot glue them together. That is it! I also punched out a bunch of butterflies to add to the flowers and board. 


I love these little die cut banners so much. The pattern on these cute yellow ones are my favorite. I added them to the flowers in a couple different spots. I also made a quick twine banner to attach to the top. Super cute!

I also used a big, gold sticker that says Be Awesome in the lower corner. I backed the sticker on a piece of scrapbook paper to give it some form to stand on. I think if I were to make this again, I would try it with some acetate. I think it would look great if the background was transparent. Hmmmmm, maybe I need to make another one! :) You can see all the large mambiSTICKS right HERE.


All I had to do was add some inspirational quotes and a picture with mini clips. It came ready to hang, so now to the wall it goes. Such a perfect springtime project!
Happy Creating!

Tuesday, December 30, 2014

DIY New Year's Eve Wine Charms

0 comments

How cute are these little wine charms? Yesterday I shared a festive 2015 banner (HERE) and today, adorable matching wine charms. They were created to add some special homemade touches to New Year's Eve, but they can be made for any occasion. All you need are a few supplies, paper from me & my BIG ideas & the possibilities are limitless. Talk about a perfect hostess or housewarming gift!

Lets get to the creating!

You will need: Bottle cap necklace charms, small washers, one inch paper punch, mambiSHEETS, one inch clear epoxy stickers (I used Spare Parts from Hobby Lobby, hot glue gun, ribbon or twine

The process was super easy and didn't take much time at all. Here it goes!

1) Punch a bunch of one inch circles out of chosen paper. Make sure each circle is different (That's how each person knows which glass is theirs!)
2) Attach epoxy sticker carefully and rub on a hard surface to lessen air bubbles
3) Attach washer to the top of the bottle cap charm
4) Use hot glue to secure the domed circle to the bottle cap
5) Tie a pretty ribbon or piece of baker's twine to each cap
6) Make as many as you want and enjoy!!


I can't wait to use my new wine charms and I think I may just 
have to make more! :)

Come visit the mambi BLOG and read about the DIY 2015 Banner right HERE!

Be sure to have a fun & SAFE New Years!
Happy Creating Friends,

Monday, December 29, 2014

DIY 2015 New Year's Eve Banner

0 comments
Hello Creative Friends!

It has been awhile since I last posted here on Sadie Inspired, but I hope your holidays were full of sparkle and cheer. My Christmas was blessed, busy, full of love AND over in a blink of an eye. How about yours? I still can't believe that 2015 is coming at us in a couple days. Wow! 

As I begin (and I mean BEGIN...it takes me daaaaays) to pack away all my holiday decor, I thought it would be fun to share a 2015 banner I made using some me & my BIG ideas goodies, ribbon, and some cracker boxes. It was quick, easy and can bring a bit of festive happiness to New Year's Eve.


What you will need: old card board box (thin), mambiSHEETS Black & White Trendy Graphic, Gold Rush Jumbo Alphas, white doilies, vellum, mambiSHEETS Gold Rush, black ribbon, Gold Glitter Scrolls from mambiCHIPS, adhesive, gold acrylic paint, white cupcake cups, hot glue gun

I used old cracker boxes to cut out four triangle shapes and painted each one with gold paint. I used a bit more paint around the edges to give the shapes a bit more depth. While the paint was drying, I stacked some papers from the mambiSHEETS Black and White pad with a white doily and a white cupcake liner. Once I liked the way it looked, I added a gold foil jumbo number to the top. Now, I just repeated the same process for the next three.

After all the numbers were finished I glued them down to the triangles. I laid them out along some black ribbon and used my hot glue gun to attach them. Finally, I added a bit of embellishment for interest. 


It really turned out cute and looks darling hanging on a shelf in my house. I always love the color combintion of black, white & gold. It is perfect for 
a New Year's celebration!

You can find all these fun supplies right HERE.

Come back tomorrow when I share some festive wine charms that match this New Year's Banner. Too cute!

Happy Creating!


Thursday, December 11, 2014

Handmade Christmas - DIY Coasters

1 comments

I love making handmade gifts for Christmas. Not only does the art or crafting of the project ease the craziness of the season, but it also brings lots love to the receiver. I always love seeing the reaction when someone special opens up a package made by hand! Are you making anything this season?

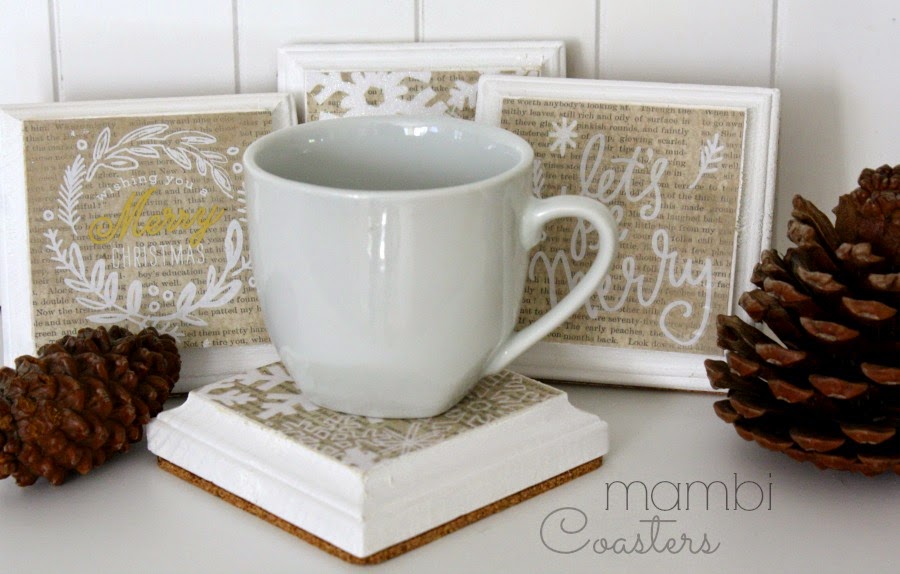
One super fun gift giving idea is making coasters! There are SO many different ways to put them together. Plus, they are super easy to make and you can pick up just about everything you need in one place (in my case Hobby Lobby). 


All I needed for this project was plain wooden coasters, paint, All That Glitters mambiSHEETS 12 x12 pad, pre-cut 4x4 cork pads, Modge Podge, and some beautiful Gold Foil mambiSTICKS. For the finishing of these beauties I used some spray protectant to keep the coasters safe from water damage and some twine. The tag was actually cut from a sheet in the mambi paper pad. 


You can see the process I used over on the mambi blog right HERE. Seriously, so fun and kids would love participating too. 


I also made these pretty coasters using a page from that same mambi paper pad. Isn't the white and gold gorgeous? I am slightly obsessed with this combo, so I fell in love with this paper! Swoon!! For these coasters I used square tiles rather than wood. Don't forget to spray these beauties with water protection too. 


I can't wait to give these to my friends. I think they will LOVE them!
Come see my project on the mambi BLOG

Happy Creating,

Thursday, October 30, 2014

Fall Home Decor - Wood Blocks with mambi

1 comments
I LOVE decorating for fall. Don't you? I really don't decorate much for Halloween...just outside with some spiders, webs, crows, and maybe a few bats. Inside the house, I love to warm the rooms up with autumn colors, leaves, pumpkins, and anything I can find or alter to bring the season to life.

Today I have a super easy and fun fall project to share with you. The best part... I started with some old wood blocks I had in my "leftover bin" in the garage. (I have an old crate sitting in the garage to collect scrap wood from various projects my Hubby or I have worked on.) 


Here is a list of materials I used:

Old wood blocks
white paint 
white doilies
twine
small wood finials
mambi SHEETS - Mixed Media, Gold Rush & Straight to the Heart
mambi Fall Leaves Die Cuts
mambiSTICKS Large Alphas - Gold

I really love how they turned out! 
If you want to see the steps I took to make this fun fall home project, please come visit the me & my BIG ideas right HERE!


Happy Creating!


Monday, June 2, 2014

Another mambi Monday - DIY Wall Picture Ledge

1 comments
Recently me & my BIG ideas released new DIY Gallery Art Pads. The concept is brilliant! Each pad has a bunch of fun art and/or patterns to create your own super stylish gallery wall. Really, all you need to go along with it are some frames, a hammer, and nails. The front even includes hanging ideas! But...I mean, twist my arm to HAVE to look on Pinterest for ideas too. ;)

Today on Sadie Inspired, I want to share one of the two picture ledges I put together. I used one pad and still have more art for other places around my house. The other ledge is featured today on the mambi blog! You can read all about it RIGHT HERE.


In one of our rooms that we call the "music room" because it houses the piano, we have a wall with a tall shelf in the middle. On either side, my multi-talented Hubby installed two picture ledge shelves using plans from Shanty 2 Chic (visit them here). I wanted to give them a face lift with some fun, fresh goodies and the mambi DIY Gallery Art Pads were perfect.


I cut this small HOME piece from the pad and thought it would look great on some burlap. All I did was wrap some rope around the top and bottom, tied it in the back, and slipped in the paper. I love that I can change it out later for a new look. The backing to the black and white picture also came from the pad.


I loved the neutral color in this print. Plus it matched the other picture ledge well. The quote by Tom Petty was pretty fitting for a "music room" too! :)


The large R was already something I had up on the picture ledge. I found it on sale at Hobby Lobby awhile ago. I have every intention to paint it a different color, but for now it works. I LOVE how big it is.


Also, on the far left, I glued two small wooden clips to another burlap canvas. Now it can be used as a backdrop for various pictures and prints. It is a quick way to create a picture display.

Come on over to the me & my BIG ideas blog to see the other side I put together! I just LOVE how I was able to freshen up my home décor so easily. I wonder what I will do next?!

Happy Creating!!

Monday, March 24, 2014

Adorable Dry Erase Board - Mambi Monday

2 comments


It always feels good to get a little praise, right? I wanted to celebrate little "happy moments" here at my house and thought a changeable dry erase board would be perfect. 

I knew the new me & my BIG ideas jumbo stickers would be perfect. These stickers are SO much fun. The package I have called Inspirational, had this circular High Five sticker that I fell in love with. It was perfect! (You can find these cute jumbos at Michaels or in the mambi shop.)

I grabbed a $1 frame from my stash. It was already painted a really fun, bright aqua. I found a grid patterned paper in the Cool Kid mambi 12 x 12 paper stack. I used a strip of red paper with silver stars along the top to anchor the sticker. I peeled off the sticker and laid it down. Put everything back into the frame and I was done. SO fast! SO stinkin' cute! It took maybe 10 minutes, which in my book makes it even better. :)

Now, I (or anyone else in my family) can grab a dry erase marker and spread a little praise in our house. Of course we like to tell each other all the time. But, it's just a wee bit more exciting to write it down. 

So, GO...go right now and make your own!
Spread some praise. :)
Happy Creating!!

Monday, March 3, 2014

Inspiring Mixed Media mambi Word Art Frame

0 comments
 
I always LOVE quick, easy projects, don't you!? The best part of this project was using something I already had in my house and I am sure you do too. I found an old frame I had laying around and decided I wanted to give it new life.
 
SO, the first thing you need to do is go grab an old frame. If you are like me, you probably have one sitting on a shelf that every time you pass..you think, "I need to do something with that!" Now is the time! :) Mine does not even have the glass anymore which is perfect.
 
Grab that frame, put on your favorite music and  begin to glue old book pages to it using gel medium or Mod Podge. Once that dries add some gesso. Now the fun really starts. Pull out your acrylic paint (I grabbed for some of my favorite shades of blue & sea green) and start adding some color. I love using my fingers. I really love the control it gives me.
 
 
Once the color was added in several layers, I added some white paint through some fabulous stencils I picked up last week. I also raided my embellishment drawer and found a Recollections metal piece perfect for the top after a coat of gesso. A couple of Recollections flowers for the bottom corner really finished off the frame. :)


What to fill the frame with was super easy. I mean...absolutely simple. The me & my BIG ideas 12 x12 paper SHEETS and their various different cards have SO MANY inspirational quotes to choose from. I knew that I wanted something super positive to hang where my cute kiddies could get a quick little "pep talk" for the day. How great is this one? I actually cut out just a portion for this one. I love it. It makes me smile. :)
 
All I did was add some pretty turquoise mambi paper to some cardboard. Then I mounted this fabulous quote to some gorgeous greenish wood grain paper. Finally put it together with some pop dots and it is ready to go! I love it!
 
I hope you like it too. :)
Happy Creating!
 
If you'd like to see the fun things mambi has to offer, pop over right HERE
If you'd like to see may day to day creative journey, come follow me on Instagram @sadieinspired.


Wednesday, December 11, 2013

Painted Mixed Media Christmas Card

5 comments

How fun is this little painted Christmas tree? 
Do you like to make your own cards or gifts? 
Today I have a perfect little project to share! I painted this mini Christmas scene for a holiday card. But, it could easily be made into a canvas for a bit of whimsy art or framed for a gift. It was super easy and fun! Let me tell you how I created it!

First I used a heavy duty piece of card stock from some packaging that I saved from the recycle bin for the base. I created a mixed media background using layers of paper, stamps, ink, pen, acrylic paint and rub ons. Then I used some fun patterned paper from me & my BIG ideas to cut out the shapes for the tree, trunk, presents, and half circles along the top. I didn't measure. I just cut away. :)

Using some matte Mod Podge I glued the scene together. Once that dried, I added paint to each piece lightly with acrylic paint. I wanted to tone down the patterned paper a bit, but still allow the designs to show through. This is a great way to tone down bright patterns for your scrapbook layouts too. A thin layer of white gesso always does the trick for me!


Finally, I added details like shading, bows, and Merry Christmas stickers from Cosmo Cricket. I used a small white button for the tree topper, attaching it with some E6000 glue (use with GOOD ventilation!). Once my mini canvas was complete I added it on top of a few paper layers. Everything was placed onto a card (just some folded white card stock) and now it is ready to send out! 

The great thing about this card - the recipient can stick it in a frame and have it as Christmas decor for years to come. A sweet, festive card perfect for gift giving. 

PS I also think this would be a GREAT project for kids to make as gift too!!

Happy Creating,

Tuesday, December 10, 2013

Book Page Wreath Revisited

0 comments


I just love this wreath I made at the beginning of this year. It is one of my favorite things hanging in my house. I thought it would be fun to share this project again because it would make a fantastic, handmade gift or a bit of festive fabulousness to hang in your house.

I think I am going to make another one for our front door. In my head I see a bit of Heidi Swapp gold Color Shine spritzed onto the paper rolls for a bit of bling and some pretty Christmas ornaments for the center. Sounds divine!

Come read my original book page wreath post right HERE!

Happy Creating,

Friday, December 6, 2013

Quick & Easy Holiday Card

1 comments

Here is a super quick & easy card I made using the me & my BIG ideas CARDS in an INSTANT. Seriously, so super easy!

I don't know about you, but I love making my own cards for Christmas, birthdays, or what ever the occasion may be. (DIY wedding card) It just means a wee bit more to the recipient when things have a homemade touch. The mambi cards make everything so easy.

All I did was fold the patterned paper (already sized & perforated) in half, use some scraps from the large 12 x 12 mambi pack to run horizontally, then placed a card from one of the CARDS in an INSTANT pack right on top. I did add some black paper behind to help it pop off the page. I hole punched the top and added some decorative twine. Finally, I made a few of those darling snowflakes stand out by adding a white puffy snowflake sticker (mambi STICKS). Too cute!


On the inside, I didn't want it to be plain white, so I glued a piece of the pretty aqua paper to the bottom. Then I placed the matching card on top. I slipped doilies under the card on the top & bottom. Now, it's done and ready to be given to someone special.

It really was quick and easy! :)
Come see my card on the me & my BIG ideas blog right HERE!

Next time I will share a mixed media Christmas card. It will be a little more messy (yay!), but who doesn't love some paint on their hands!?

Happy Creating,

Monday, November 18, 2013

Gratitude Jar - mambi Design Team Project

1 comments
Hi all!
I hope you had a wonderful weekend. :)
 
I had a creative weekend...painting, scrapping, and crafting away. Thanksgiving will be here in no time and I have a super fun, easy DIY project up on the me & my BIG ideas blog today.


It would be a perfect addition to your Thanksgiving day and décor. Come read all about it

Friday, October 25, 2013

Faux Flair Friday #3 - Dimensional Washi

1 comments

This week I made some flair buttons using washi and Diamond Glaze. I have oodles of washi tape and finding ways to use it up always make me happy. I honestly don't think I'll ever use it all up, but it's worth a try. :)

In past weeks I have demonstrated how to make faux flair using scraps of paper and got artsy making some mixed media beauties as well. The process is basically the same this week, I just simply traded out the one inch epoxy stickers for Aleene's Paper Glaze or Diamond Glaze. (You could also use Mod Podge Dimensional Magic)

Let's get started!

 
Grab some more scraps or plain card stock, washi tape, and a one inch circle punch. I used the back side of my one sided patterned paper. I am really trying to use these up too!


Cover your paper with the washi tape you choose. Some patterns on the washi will line up nicely while others will not. That didn't bother me though. Embellishments or words can always be added afterward to hide the imperfection. :)


Next, punch out the circles. In hindsight, I should have used a wider piece of paper so I could have punched two circles. I just punched some semi circles out from the left over space.


Now, it's time to jazz your little pretties up! The great thing about making "flair" buttons like this is that your embellishments do not have to lay flat. When using epoxy stickers that is not possible. Here I was able to use stickers like me & my BIG ideas mambi STICKS. They are so cute and have a great price. I also used some Cosmo Cricket word stickers from Joann's.


I placed my flair badges in a flat, shallow box and began adding Aleene's Paper Glaze. I also made some using Diamond Glaze as well and prefer it to the Aleene's. I always try out the glaze on a scrap paper before adding it to my projects. Also, keep a tiny pin near by to poke any air bubbles that might make their way into your circles. I move slow in a circular motion watching the nozzle to see if I can catch any bubbles before they come out. If they do, just pop them with the pin.

I cover mine up with a plastic lid and let them cure for at least 24 hours. I added glitter to mine to give them a bit of bling too!


They turned out darling! 
I am looking forward to making some more for some upcoming Christmas projects! (I am trying not to hyperventilate... the holidays ARE here, and there is SO much to do. That's why my motto this year is simplify & simplify some more!)

Happy Creating!
(Don't forget to check out my other flair - HERE & HERE)

Friday, October 11, 2013

Faux Flair Friday #2 - Mixed Media Embellies

1 comments
Remember last week when I had a blast making darling little flair buttons using epoxy stickers and some of my favorite patterned paper. Well, this week I have been doing more of the same. Except this week I have been busting into my paint, watercolors, stamps, markers, and Mod Podge to make these cute embellishments. Using paint and your own created art makes them SO versatile! Look at how easy they are to make!


I grabbed some watercolor paper from my stash and began making a mixed media background. You could use some light colored card stock, but watercolor paper will hold the wet media much better. I added book text with some gel medium, doodled with my Faber Castell PITT pens, added inexpensive watercolor, watercolor crayons, stamped, stenciled, and just had fun. The most important thing is to have fun, right? Don't worry about making a mistake. Just mark, doodle, smoosh (is that a word?), swipe, scrape, drip, smear, dot, and create to your heart's content. When you're finished, stand back and admire your beautiful work.


After I let my pages dry for a bit, I punched some one inch circles out. I sorted through them and chose my favorites. Like last week, some I left plain and others I added words for variety. 


I carefully added the epoxy stickers on top and rubbed the back to completely adhere the paper. I just love how they turned out. They will certainly make a pretty layer on a scrapbook layout, journal page, card, tag, or canvas. LOVE them!


I am starting to grow a wonderful collection of these creative little goodies, so I better get busy making some projects! What are you working on? Do share! I'd love to hear all about it. Better yet, leave me a link so I can come visit. :)

Next week, I will be back with some washi buttons. Cute! Who has oodles of washi? I know I do. Let's turn them into some fabulous faux flair!

Happy Creating,
(You can read last week's post right HERE)

Friday, October 4, 2013

"Faux Flair" Friday - Make Your Own

1 comments


I don't know about you, but I have a ton of paper. I mean A LOT. After doing oodles of mixed media, art journal, and scrappy projects... I also have a TON of scraps. I just can't seem to throw those pieces away (they usually end up in my mixed media backgrounds). I am always thinking of ways to use them up. I bet you are too! 


  Lately, flair buttons have become super popular. There are so many cute designs! I adore them. I thought it would be really fun to try and make some of my own. I think making my own adds a little homemade feel to my projects and I can alter them any way I need to. It is such a perfect way to match embellishments to whatever projects I am working on. Seriously, after making a few...I am sold, and there is just so many options to make them unique. Here is what I did! 

 1) I gathered up all my fabulous scraps. I always keep a small recycled container by my Project Life/scrapbook station (hello, dining room table) and my art table to collect bits of paper.  :)


2) I used a one inch circle punch and punched away. I like to punch a bunch out at one time. That way I have them ready to go for any crafty project.


3) Once my circles were ready I decided to embellish some, doodle some words on a few and left some plain. I also loved using little word stickers. This is a GREAT way to tailor your flare to your needs!


4) Finally, I used some Spare Parts (the Paper Studio) 1 inch epoxy stickers and added them to my punched circles. It can be a little tricky to center the epoxy right onto the circle, but you can carefully trim around the edge after if needed. I don't mind the imperfection at all. 


5) I turned each "faux flair" over and rubbed the paper on the back to make sure I got any air bubbles out. Again, I am not a factory and they may have imperfections. Especially, if I altered the circle with something that had  dimension...the sticker may not lay completely flat. No problem!

Look how cute they turned out! Eeeek, LOOK at that gold beauty in front. I made that one from a mambi Specialty Card. The glittering star is Dear Lizzy paper and a Stickerdoodle sticker. Too cute!

Here is a "faux flair" I made for an embellishment cluster on a 12x12 layout recently. Adorable, right!? That heart was created from one of the me and my BIG ideas 3x4 POCKET PAGES card packs. I simply punched it out & added the epoxy sticker. It was a cinch and it added some needed dimension. Not to mention adding to the cuteness factor. ;) (Layout post coming in the future.)


I am in love with this crafty process! So, I will be making some more. There are all kinds of things to be done with them - add to a Project Life layout, attach to an altered canvas, layer up a card, personalize a journal, and so much more.


Come back next Friday when I show you how I made some mixed media flair!! I KNOW you what to get those hands messy...so, I will see you right here next Friday! :)


Happy Creating!