Showing posts with label Paint Party Friday. Show all posts

Friday, February 8, 2013

Artsy Insta Friday

13 comments
Even when I can't write a full blog post (where does my time go?), it is always fun to capture little bits of creativity with Instagram. Are you on Instagram? (If you are, let me know in the comments so I can come find you!) Not only do I love sharing what I am up to, but I LOVE seeing all the artsy goodness from the wonderful people I follow. So much loveliness - crafters, scrapbookers, artists, Project Lifers, home bloggers, mommies, and friends. It is a super fun and shall I say a wee bit addicting. :) I guess there are things more terrible than Instagram to be addicted to! Here are a few "artsy Instas" from my world lately ...

Playing with the idea of feathers and little whimsy characters. She says, "being brave is not always easy."
Portrait on a wood block. Inspired by yellow and gray. Post coming soon.

LOVING my new Faber-Castell Gelatos. I only have 4 colors and want more!

Working on a journal page

Creating little goodies at a Stampin' Up! party.  SO fun!

A bright journal page WIP


I had to throw this one in of my dog. We joke that she is a chihuahua trapped in a Golden Retriever's body. She does not realize how big she is! She wants to be a lap dog. :)

I hope you have a wonderful, love filled weekend!
(Find me on Instagram @sadieinspired)

Also, come visit the artists at Sneak Peek Friday and Paint Party Friday too!

Friday, February 1, 2013

Alice Journal Page

10 comments
I love Alice in Wonderland. Don't you? I  have always loved the Disney version and the book. When my daughter was younger with her long blonde hair...I always thought she looked like Alice. Plus, with a total obsession with all things Disney as a little girl, she had the CUTEST Alice costume. The other night Alice in Wonderland was on TV, so I snuggled up with my kiddies and watched it. So much color and interesting shapes in that movie!


So feeling very Alice inspired, I painted this journal page. I thought it would be super fun to paint one of my girlies like Alice. I wanted it very whimsical and sweet. I started with a pencil sketch...very loose and quick. I work best that way. Quick, so I don't get carried away thinking too much. If only I could expend that thinking energy towards finding a way to make laundry disappear in this house. Ha!


After a thin layer of gesso, I worked on the background with watered down acrylic and inexpensive Artist Loft watercolors. I used more acrylic for her body and the groovy purple shape going vertically up the page. I used watercolor crayons and more gesso for her face. As usual I added detail with pen and my Faber Castell PITT pens. Finally the stamped words and some purple sparkle.


The rabbit makes me laugh. His expression is too funny. He is like, "Um, WHAT do you think you are doing?" I am hoping to find a little metal clock to glue to his belly. Don't think that would be cute? I think it would be a fun addition. I guess I will have to go hunt in the scrapbook aisles of Michaels. Oh Darn! :)


 Well, that's it. That is my whimsical, little page. I hope you enjoyed it and I hope you enjoy the coming weekend (TGIF!!). 

But, before I go... my heart is melting...


Happy Creating! :)


StudioJRU

Saturday, January 19, 2013

Sometimes I Wander

7 comments
Happy Weekend Lovelies!
Today is GOR-geous outside and I am super excited to get out there and tackle this day. I am filled to the brim with gratitude (and maybe a little coffee) today. I am feeling very blessed this morning...that I am able to face this day with love, health, and a smile. 


 I worked on this journal page quite a bit yesterday, but unfortunately lost the race against the sun to get a picture. :) The page started with a bunch of book pages and bible pages. Over that I used gesso (thick and heavy) with acrylic paint in greens and blues. Once I started adding more and more, I started to see the shapes emerge. So fun, right!? I love how things just pop out and say, "HI! Here I am." 


I like her tilt. Lol. That sounds funny, but I do. I like the slant of her body. I am still stacking circles on tops of heads for hair. Maybe, she is hanging to the right because that hair is too heavy. Ha!

I did sit for a bit...waiting for the words to come to me. Sometimes I create a piece with words or quotes (scriptures too!) already in my mind. The words inspire the painting. With an intuitive, pulled page I let the words come from the story that unfolds on the sheet.

"Sometimes I like to Wander."
9x12 journal page


Do you like to wander?
Have the loveliest of weekends too!


Friday, December 28, 2012

Give Love

8 comments
Hello friends! I hope you had a wonderful Christmas!
It came and went in the blink of an eye, didn't it? It has been such a whirlwind of goodness around here. This thankful girl is typing this blog post from a new, little laptop. My darling Hubby surprised me with it Christmas morning (very sneaky that one).  I am beyond excited to have a computer that is all my own...and portable! :) I am still getting used to the Windows 8 format though! Total learning curve for me. I need to get some kind of skin and sleeve/case for it too...any suggestions!?

Last night, after all the holiday glitter had settled,  I was finally able to do some painting in my journal. It felt really fabulous to just sit and create. I plopped down on the couch, got out my pencil and water soluble crayons, then got my creative mojo flowing. I must have been in a sweet, whimsical mood because this is what I painted...


First, I sketched her out with my pencil. My mind is already thinking ahead to Valentine's Day so love and hearts appeared. :) The page already had some gesso here and there which gave it yummy texture. Remember, I do not waste a thing...so I use pages of my journal to wipe off excess stuff from other projects. I use A LOT of gesso, so heaven forbid if I don't use every last drop.


I used my Caran D'Ache crayons to add color, followed by my water brush to blend. I didn't use anything else. Just water and the crayons. I originally planned on adding some acrylic paint later, but I don't think I am going to. I like her just the way she is.  She's a little cutie.


Here she is in all her Instagram glory. :)
I keep thinking about how important it is to "give love"...even when you don't want to, even when you're tired, even when you are mad or hurt, even when you feel they don't deserve it...give it anyway. I know I need that reminder.

xoxo,


Friday, December 14, 2012

From Trees to Angels and Elves

20 comments

Now that I have painted trees for days my creative attention has turned to angels and elves. Inspired to use molding paste for wings, I painted these two new angels on wood. The first one is painted on a thin wood plaque with rounded corners. The second piece is on a wood block that is thick enough to stand on it's own, which I love. I LOVE how the modeling paste looks especially with some pearl shimmer added to it. 


 Who doesn't love a little sparkle?

Playing with collages in Picmonkey
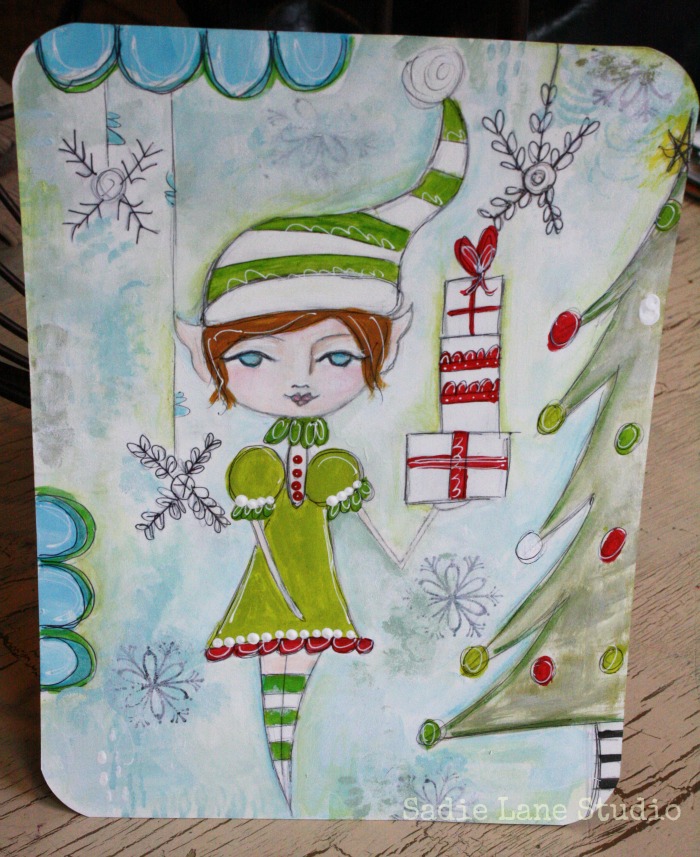
Then, after seeing my daughter drawing some elves, ideas started popping into my mind. I wanted to draw an elf in my little whimsy girl style holding some packages. I just grabbed a piece of paper (that came out of some packaging) and quickly sketched. 


She is too cute. I love how she turned out. :) I think I may paint another one to frame and add her to the Christmas decorations in my daughter's room. I would paint the next one in non traditional colors like lavender, aqua (oh yeah) and pink. Maybe holding candy and a gingerbread house. Eeeekkk! Cuteness! :)

Do you like using molding paste as much as me???
Hope you are having a wonderful, creative week!

Thursday, December 6, 2012

Christmas Tree Crazy

26 comments
I am absolutely bonkers for Christmas trees. I am. Totally smitten. I would probably have one in my house all year if I could. Right now I want one in every room of my house. Lol. We have one in our family room and then each one of my kids have a small (colored) one in their rooms. I love decorating them so much that if money fell from the sky each Christmas I would have a bunch so I could decorate them all differently. Yes...totally themed. I like a themed tree. I am not "crazy tree lady." Kiddie ornaments can be on the main tree. Nemo is right there in the front of our white, silver, snowflake tree - staring at me every day.  :)

Besides a few things for the kids, my hubby and I braved the Black Friday early morning crowds to score a Martha Stewart fakey (dont judge). I never thought I would own an artificial tree. But, I do...and I love her. 

Naturally, in my art...trees have taken over! Not whimsical little winter creatures, angels, nativity scenes, mittens & snow. 
Nope. 
It's been all about the tree. 

Magnet trees...


Canvas trees

Mini trees

Whimsy trees

Wood Cut-out Trees

Ornament Trees

See. It could be an illness. :) 
Of course, I am kidding. I just love Christmas trees.
What about you? Do you have the love too?

It has been awhile. But I am joining the Party!


Saturday, October 20, 2012

Current Obsession - ATC Girls

4 comments

ATCs (Artist Trading Cards) are so fun to make and painting fun little whimsy girls on them is even better. I am addicted. I have been painting these little beauties for the shop (which I will start stocking tomorrow...yippee! I only have 4 things listed right now, so they are very lonely. Lol) and can not stop. :) Kinda like when you eat M&Ms.... you know how you can't just stop at one. 
It is exactly like that.

I gesso a bunch at one time and let them dry. Then I create the first layer with my watercolors and water brush. The ATCs are the perfect size to take with me to the couch when I watch TV at night. I usually bring my pencil with me and sketch the face too. I love how quickly watercolor dries. It really makes them perfect for a first background layer. After I have several cards done I have been giving them a quick spray with fixative. When the portraits are this small, I don't like the graphite to move around on me. 


The following day I will finish them up in the studio with acrylic paint, pens, stamps, stencils, etc and finally some words. Super fun! I guess I should be calling them ACEOs since they are heading to the store. I did a little research and found out that when ATCs are going to be sold instead of traded they are referred to as ACEOs or Art Cards, Editions, and Originals. 
Either way, I love them!


I hope you come visit on Monday to see all the new things I have been working on for Sadie Lane Studio, but until then you must come join the Party. I am late...but, I can't help it - I must go Party! :)

Smiles,

Saturday, October 6, 2012

Aqua & Orange

12 comments
with a bit of yellow and pink is my new color combo obsession.
It is so bright and cheery. It just makes me smile.

I painted these two the other day, while cleaning out my studio. Holy Cow! This was MUCH needed!. I was sorting, moving things around, separating, organizing, painting (preparing for the re-opening!), washing, tossing, running to the table for more painting, discovering forgotten items , dancing (sometimes I can't help myself), hanging things, and getting things done! 
It felt so good to get the studio clean.


This one was painted on a 6 x 6 cradled wood panel. I adore painting on wood. Plus, I love painting things that are ready to hang. So these are perfect! BTW, where do you get your panels if you paint on wood? I had the background painted a while back and it had just been sitting there waiting for me to finish it. It is all paint. I didn't use any paper except for the words. I used a Gelly Roll, black Pentel pen and some Faber-Castell pens for the details. Now she is ready for some varnish and a photo shoot. She (total female this one - see those colors! Ha!) will be headed to the shop very soon.


Loving happy colors!


This little scrumptious cutie is a 4x4 canvas panel. The flower on the right side is from the collage sheets I made the other day. So fun! I also really like using motivational quotes, words, or saying in the pieces I create. Just positive reminders that we all need. I know I do! She will be making her debut in the shop on the 22nd. :)))

What colors are making you happy?

Oh, and don't forget...


Saturday, September 29, 2012

Let Your Dreams Fly - Journal Page

9 comments

 Big dreams can be scary...and exciting at the same time.
They can make butterflies flutter in tummies and hearts beat a little faster.
At times, those little seeds of possibility make me wonder if I really CAN.


I know that even when dreams make us anxious, nervous, or unsure - I can't retreat and give up. I have to give my dreams wings and see where they can take me. If there are things that I wish for...big things...huge hopes...they are not going to simply plop down in my lap. I have to move forward, take action...do something!


For me, I sometimes lock up my aspirations in my heart and leave them there. Little things I hope for held hostage because I am afraid to set them loose. Do you ever feel like that? I am afraid that I am not good enough or people will laugh at me or failure will hunt me down. Yucky fears taking over, right!?


But, you know what I say to that...WHO cares. I can't let fear run the show. YUCK! That's no fun! I mean, really...who cares if some people don't like my art, someone will! Who cares if others don't understand what I am doing and this new found passion. I know it brings me so much joy, excitement, and a place for release. Who cares if failure grabs me by the neck and throws me down. I will pick myself back up and continue forging ahead with many lessons learned. In other words nothing is stopping me. Nothing is stopping you! :) 

Soooo, let your dreams go and watch them fly!!! I know I am. :)


Friday, September 14, 2012

An Up-cycled Puzzle Box Art Canvas

21 comments

 Happy Weekend!
I am am super excited to share this little project with you today. Super excited. (Cheesy grin) I have another canvas to show you made from something that would have otherwise ended up in our recycle bin. In the past I have transformed shoes boxes into pieces of art to hang on our walls, but today I used an old dollar store puzzle box. Yipppeee! Since everything in the store cost a buck this little bit of happiness was practically free. I don't know about you, BUT I love finding good deals on home decor and this is a steal. It is so super easy!  Even if you have never painted before - you can do this!
So let's get started...

Wait. Hold on. Before I start...I was a bit confused about Recycling vs. Up-cycling. The concept of up-cycling is not a new one, but the term is. Now I am NO expert but basically up-cycling is taking something headed for some land fill and creating something with equal or greater value/purpose. For example; glass bottles into a chandelier, cheese grater into earring holder (seriously), old tires into planters, etc. You get the picture. Recycling is when an item is taken and through chemical process changed back into it's initial form or something with sometimes lesser value. For example; plastics into sleeping bag filling, cardboard boxes into recycled paper, aluminum cans into new cans, etc. See the slight difference. Like I mentioned, "up-cycling" is a fairly new term. But artists, renovators, and crafters have been doing it 
for a long time!

OK. Now, let's get started! :)

First, find any box you want to save from the recycle bin.


 Use old book pages to cover the surface.


Glue down the pages using matte medium or Mod Podge. I used Mod Podge for this one. To avoid bubbles try using an old credit card or something flat to burnish it to the surface. The paper not only creates fab texture for the background, but it also reinforcing the box to make it more sturdy. It did come from a dollar store...so it's not the strongest. :)


Don't forget the edges!
 

Here it is just waiting for some gesso.


I covered the surface with Liquitex gesso. I put down a pretty think layer in places so I could doodle and mark into it. I love the added texture that it creates.
 

Now, choose a color palette. Hmmmm, I think I see some turquoise. Lol. It is still my absolute favorite. 


Add some color using your fingers and an occasional paintbrush. :) I can't tell you how much I love painting with my fingers. The placement of the color can be so random and plus it is just way too much fun! Welcome back to Kindergarten. 


I painted some butterfly chipboard pieces I had in my stash using a contrasting color to make them pop. After they dried, I attached them using some foam adhesive squares from Recollections. I knew I wanted some dimension and these worked perfectly. 


I doodled some more with a white Gelly Roll and added some white rub-ons.


There you have it! 
I love how this little puzzle box turned out. It will look perfect on my wall and I can't beat the one dollar price tag. So, the next time you are about to throw something out...take a second look at it. Maybe it is just waiting to be turned into something fabulous! :)

Linking up with Paint Party Friday and Studio JRU.